
Download the latest CBSE Class 4 Computer Science Exploring Windows Notes in PDF format. These Class 4 Computers revision notes are carefully designed by expert teachers to align with the 2026-27 syllabus. These notes are great daily learning and last minute exam preparation and they simplify complex topics and highlight important definitions for Class 4 students.
Revision Notes for Class 4 Computers Exploring Windows
To secure a higher rank, students should use these Class 4 Computers Exploring Windows notes for quick learning of important concepts. These exam-oriented summaries focus on difficult topics and high-weightage sections helpful in school tests and final examinations.
Exploring Windows Revision Notes for Class 4 Computers
CBSE Class 4 Exploring Windows. Learning the important concepts is very important for every student to get better marks in examinations. The concepts should be clear which will help in faster learning. The attached concepts will help the student to understand the chapter and score better marks in the examinations.
UNIT-3
EXPLORING WINDOWS
STARTING WINDOWS EXPLORER
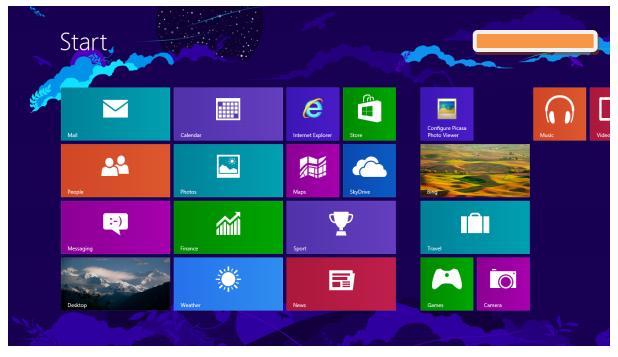
The Windows Explorer lets us view, open, copy and manage our files and folders in the Windows operating system. In Windows 8, the live tiles can be seen by clicking on the Windows logo or clicking on the left bottom corner of the window. The live tiles organizes various application into a single window and also provides live feed.
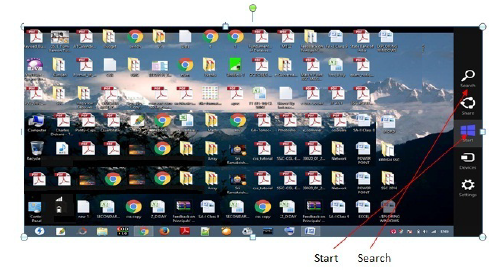
The Windows Explorer can also be opened by clicking on the ‘Start’ button which appears when the mouse is moved to the right bottom of the window.
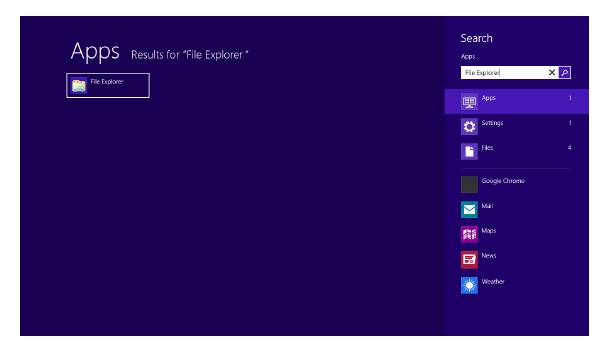
Open File Explorer by swiping in from the right edge of the screen, and then clicking Search, entering File Explorer in the search box, and then tapping or clicking File Explorer.
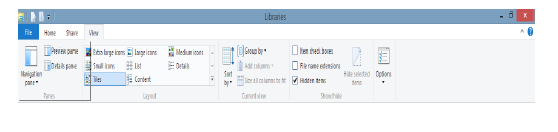
3.2 COMPONENTS OF WINDOWS EXPLORER The various components of the File Explorer window are shown below:
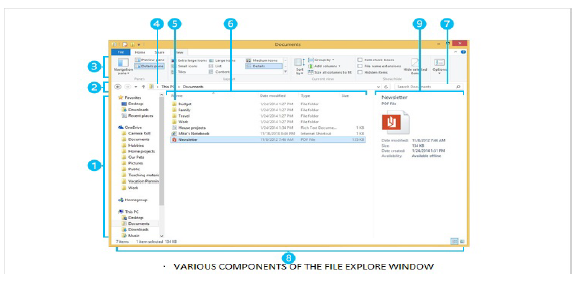
1) Left pane – It is used to get to all kinds of locations and drives.
2) Back, forward and up buttons – These are used to navigate through locations or files.
3) Ribbon – The Ribbon can be used for copying, moving, creating new folders, e-mailings, zipping items, changing views etc.
4) Address bar – It is used for entering or selecting a location.
5) File list – This is where the contents of the current folders are displayed.
6) Column headings – It is used to view the files according to our desired need like ‘Date Modified’ option sorts the files according to dates on which they are created.
7) Search Box – It is used to enter a word or a phrase to look for an item in the current folder.
8) Status Bar – It can be used to view the total number of items in a location, or the number of selected items and their total size.
9) Details/preview pane – It is used to view some common properties associated with the selected file such as author, date etc.
3.3 PANES OF WINDOWS EXPLORER
On clicking the View menu you can see the various panes available in Windows 8 Explorer as shown below
These panes are :
i) Preview Pane
ii) Details Pane
iii) Navigation Pane
3.4 WORKING WITH FOLDER IN LEFT PANE : On expanding a disk drive or clicking a window/folder like Desktop, Downloads, Recent Places etc. you can get the content of the window/folder on the Right Pane of the Windows Explorer. And on selecting and clicking a disk drive , you can get the files and folders of that particular drive on the Right Pane of the windows explorer and all the folders of that drive on Left Pane of the windows explorer. And now, you can move files and folders from on place to another by dragging and dropping the same from left pane to right pane and vice-versa.
3.5 MANAGING FILES AND FOLDERS IN WINDOWS EXPLORER : On selecting the folder in left pane of the windows explorer you can view the files present in that folder. Similarly you can view the content of a disk drive. You can even directly drag and drop file(s) or folder(s) from one location to another location same like copy and paste.
3.6 MODES OF VIEW :
The content shown on the right pane of the windows explorer can be viewed in one of the following modes Extra Large Icons, Large Icons, Medium Icons, Small Icons, List, Details, Tiles, Contents. Try it to view the effect of these modes.
3.7 FILE NAMING CONVENTION All the file systems follow the same general naming conventions for an individual file: a base file name and an optional extension, separated by a period. However, each file system may have own naming convention. Some of the basic rules followed while naming file sin Windows are listed below:
→ Use a period to separate the base file name from the extension in the name of a directory or file.
→ Use a backslash (\) to separate the components of a path.
→ Use a backslash as required as part of volume names, for example, the "C:\" in "C:\path\file".
→ Do not assume case sensitivity. For example, WINDOWS and windows should be treated equal.
→ Use any character in the current code page for a name, including Unicode characters and characters in the extended character set (128–255) except for the following reserved characters:
- < (less than)
- > (greater than)
- : (colon)
- " (double quote)
- / (forward slash)
- \ (backslash)
- | (vertical bar or pipe)
- ? (question mark)
- * (asterisk)
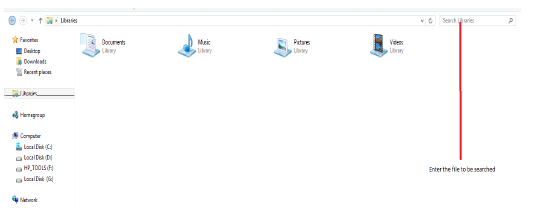
3.8 SEARCHING FILES One or more files can be search by using Wild Cards, ? (exclamation) for one character and * (asterisk) for none, one or more characters. Searching of a file can be done based on either its name or its file extension.
For Example : *.docx will search display all the document files or word files in the drive or path selected. Similarly abc.docx will search and display word file having name abc
The Search Box is shown below:
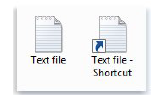
3.9 CREATING SHORTCUTS A shortcut is a link to an item (such as a file, folder, or program)
on our computer. You can create shortcuts and then place them in a convenient location of our use. Shortcuts can be distinguished from the original file by the arrow that appears on the icon.
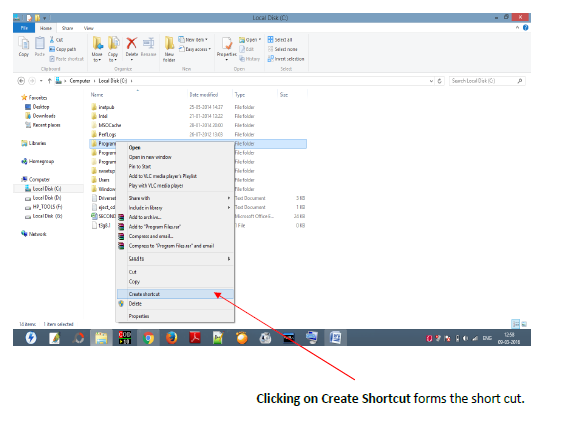
To create a shortcut
1. Open the location containing the item that you want to create a shortcut to.
2. Right-click the item and then click Create shortcut. The new shortcut appears in the same location as the original ite
3. Drag the new shortcut to the desired location
To delete a shortcut
→ Right-click the shortcut that you want to delete, click Delete, and then click Yes. If you're prompted for an administrator password or confirmation, type the password or provide confirmation.
EXERCISE
Q 1. What is Windows Explorer ?
Q 2. Write at least two points about the use of Windows Explorer.
Q 3. What is the benefit of creating a shortcut ? (Write two points)
Q 4. Why the file extension is important while saving it?
Q 5. How can you search the particular Word file in your system ?
LAB WORK
1. Search and locate the files that you have created (MyFile.docx, Family.docx) and cut-paste or drag-drop them in a new folder say My Work in D: drive using Windows Explorer
2. Search and find the number of audio files (.mp3) is there in your compute Also find the total volume of disk space occupied by them.
Please click the link below to download CBSE Class 4 Exploring Windows.
CBSE Class 4 Computers Exploring Windows Notes
Students can use these Revision Notes for Exploring Windows to quickly understand all the main concepts. This study material has been prepared as per the latest CBSE syllabus for Class 4. Our teachers always suggest that Class 4 students read these notes regularly as they are focused on the most important topics that usually appear in school tests and final exams.
NCERT Based Exploring Windows Summary
Our expert team has used the official NCERT book for Class 4 Computers to design these notes. These are the notes that definitely you for your current academic year. After reading the chapter summary, you should also refer to our NCERT solutions for Class 4. Always compare your understanding with our teacher prepared answers as they will help you build a very strong base in Computers.
Exploring Windows Complete Revision and Practice
To prepare very well for y our exams, students should also solve the MCQ questions and practice worksheets provided on this page. These extra solved questions will help you to check if you have understood all the concepts of Exploring Windows. All study material on studiestoday.com is free and updated according to the latest Computers exam patterns. Using these revision notes daily will help you feel more confident and get better marks in your exams.
FAQs
You can download the teacher prepared revision notes for CBSE Class 4 Computer Science Exploring Windows Notes from StudiesToday.com. These notes are designed as per 2026-27 academic session to help Class 4 students get the best study material for Computers.
Yes, our CBSE Class 4 Computer Science Exploring Windows Notes include 50% competency-based questions with focus on core logic, keyword definitions, and the practical application of Computers principles which is important for getting more marks in 2026 CBSE exams.
Yes, our CBSE Class 4 Computer Science Exploring Windows Notes provide a detailed, topic wise breakdown of the chapter. Fundamental definitions, complex numerical formulas and all topics of CBSE syllabus in Class 4 is covered.
These notes for Computers are organized into bullet points and easy-to-read charts. By using CBSE Class 4 Computer Science Exploring Windows Notes, Class 4 students fast revise formulas, key definitions before the exams.
No, all study resources on StudiesToday, including CBSE Class 4 Computer Science Exploring Windows Notes, are available for immediate free download. Class 4 Computers study material is available in PDF and can be downloaded on mobile.