
Download the latest CBSE Class 4 Computer Science Windows 7 Notes in PDF format. These Class 4 Computers revision notes are carefully designed by expert teachers to align with the 2026-27 syllabus. These notes are great daily learning and last minute exam preparation and they simplify complex topics and highlight important definitions for Class 4 students.
Revision Notes for Class 4 Computers Windows 7
To secure a higher rank, students should use these Class 4 Computers Windows 7 notes for quick learning of important concepts. These exam-oriented summaries focus on difficult topics and high-weightage sections helpful in school tests and final examinations.
Windows 7 Revision Notes for Class 4 Computers
Introduction
Windows is the Graphical User Interface (GUI) based operating system which is very userfriendly. Many versions of it are available in the market. Some later versions of Windows are Windows 8, Windows 8.1, and Windows 10. Its earlier versions include Windows 97, Windows 2000, Windows XP and Windows Vista.
Windows 7
When your computer starts for the first time, what you see is called the Desktop. It will look something like this:
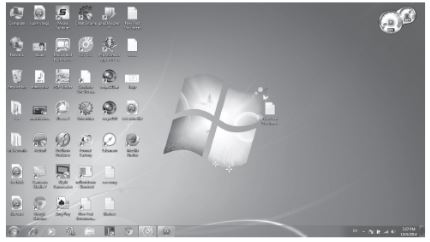
Taskbar
The Desktop is split into two areas. The taskbar is the bottom bar on your computer; it has the Start button on the left, and a group of icons on the right, typically ending with the time and date.
It consists of Start button, Taskbar Buttons, Notification Area.
The rest of the Desktop is the space where all your programs will appear when you start them up. This space contains default background wallpaper, but it can also contain shortcuts to programs, documents and folders.
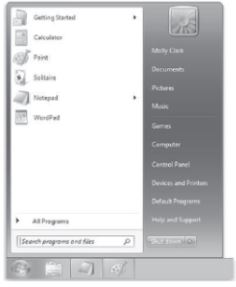
Start Button
This button is situated at the leftmost corner of the taskbar. This button opens up a Start Menu. It consists of a list of all the programs, software or games on the computer.
Taskbar Buttons
These buttons are representation of the programs that are running or in use. It also consists of other Quick Launch Buttons which are shortcut to the commonly used programs.
For example: If we are working on Ms-Paint, a small paint button appears on the taskbar. On clicking on it, MS-Paint Window appears.
It shows a list of more than one program running on the system at the same time. All these buttons which appear on the taskbar are known as Taskbar Buttons.
Notification Area
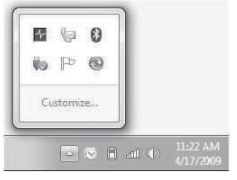
• It is present at the right-most corner of the taskbar.
• Notification area is also referred to as System Tray.
• It shows the clock and few other icons. Some of these icons are battery, sound, internet access and Bluetooth etc.
• This area provides messages or notifications about the status of some activities.
• All the notification icons can be seen by clicking at a small arrow present at the left side of the notification area. On clicking on it, an overflow Window appears. The icons on notification area can also be customised.
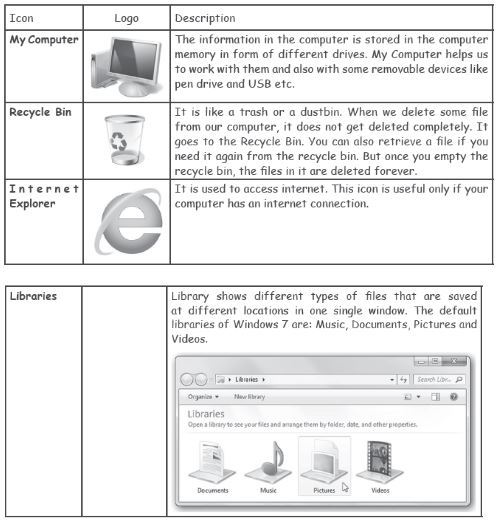
Icons
Icons are the small pictures present on the desktop. They represent different programs, folders and files.
System Icons
There are few icons that are present on the desktop by default. You cannot delete these icons.These icons are called the System Icons. My Computer, Recycle Bin and Internet Explorer are the system icons.
Files
Some files are saved on the desktop. These individual files are present as icons on the desktop. These files can be audio files, text files, program file and video file etc.
Folders
Folders can be imagined as organisers. These organise various files and folders. Desktop can be managed by putting similar files in a folder.
Locking the taskbar
1. Right-click on an empty space on the taskbar. A menu will appear.
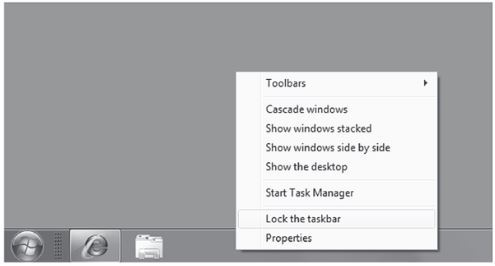
2. From the menu, select the Lock the taskbar menu option to put a checkmark next to it and lock the toolbar. If it already has a check next to it, then click on it to remove the check and thus unlock the taskbar.
Moving Windows taskbar
Taskbar is a very important part of the Windows desktop. It contains the start button and icons of various running programs. The taskbar can be customized also. We can move it to the sides and top of the desktop and can also hide it. To do so,
1. Right click on the Taskbar. A pop-up menu appears.
2. If Lock the Taskbar option is selected, then we cannot move the taskbar. To move the taskbar, we first need to unlock it.
3. Unlock the taskbar by clicking on Unlock the Taskbar option.
4. Placing the mouse pointer on blank area of the taskbar, click and drag the taskbar to your desired location.
Address bar
Users can directly open any website by accessing the taskbar. Address bar refers to the text field in a web browser that identifies the user’s location on the web and allows them to access different websites.
To Add Address Bar to the Taskbar
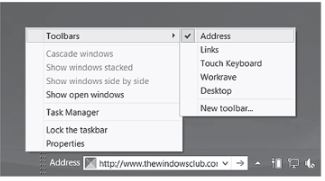
1. Right click on your Windows taskbar and unlock it.
2. Right-click and select Toolbars. A menu showing Address and other options will appear.
3. Choose Address. Address Bar will appear on the taskbar and you should see the address bar appear on your taskbar.
4. Type the website address and press Enter.
5. The web browser will be launched and navigate the user to the website whose address has been entered.
Changing size of Windows taskbar Icons
1. Click on Start→ Control Panel→ Taskbar and Start Menu.
2. Taskbar Window will appear on the screen.
3. Click on the Taskbar tab.
4. Select the taskbar button type. From the drop-down menu, click on one of the following options: Always combine, hide labels; combine when taskbar is full; never combine.
5. Check on ‘Use Small icons’ box.
6. Click on Apply→ OK.
ThumbnaiL preview of Windows 7 taskbar
Taskbar of Windows 7 shows thumbnail preview of Windows or group of Windows when you over it.
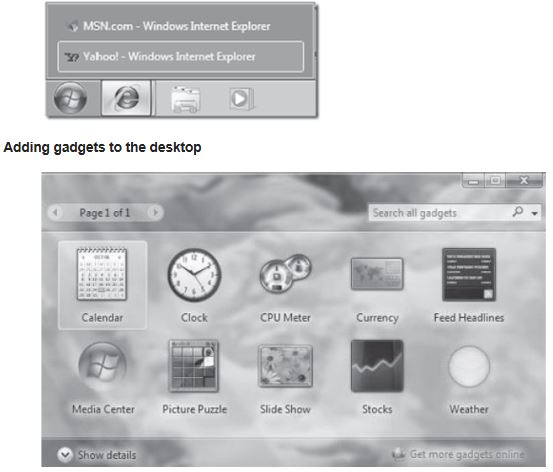
Windows comes loaded with various gadgets. These gadgets are present as mini programs. Apart from providing us the information, it is used to access commonly used tools. Some of the desktop gadgets are Clock, Calendar, Weather, Currency and CPU Meter etc.
To add different gadgets to your desktop,
1. Right click the mouse on the computer.
2. Select Gadgets from the menu.
3. A Window showing nine gadgets will appear. Double click on the gadget to add to the desktop.
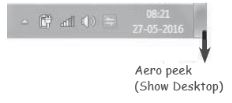
Aero peek
It is a small transparent button present at the extreme right of the taskbar. It serves as the Show desktop icon. By clicking on this button, all Windows gets minimized and by clicking on it again, all Windows gets restored.
Aero Shake Option in Windows 7
• It is a useful and an interesting feature of Windows 7.
• It allows the user to minimize the open Window applications on the screen to the one user wants.
• To use it, select or click on the opened Window application you want to work and shake it bi-directionally i.e. Forward and backward on the screen. This will minimise all other Window applications which you don’t want.
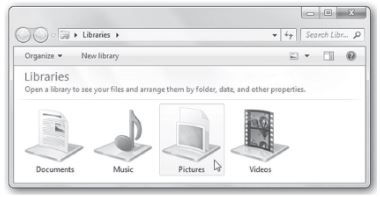
Windows 7 LIbraries
Library shows different types of files that are saved at different locations in one single Window. The default libraries of Windows 7 are: Music, Documents, Pictures and Videos.
Windows 7 control panel
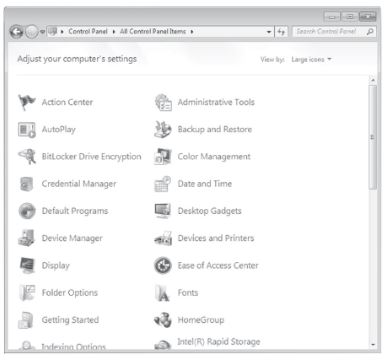
Control Panel is used to change the settings for Windows.
To open control panel,
Click the Start button, and then click Control Panel.
Sticky notes In Windows 7
To create a Sticky Note
1. Click Start→ All Programs→ Accessories→ Sticky Notes.
2. Type the text of the note. You can also format the note text if you want.
3. When you finish entering the note text, simply click somewhere on the desktop outside the sticky note itself.
4. To delete a note that you no longer need, click its Delete button in the upper-right corner.
Window controls
Minimising , Maximising and Close Options
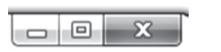
When we open any window, we can see three square boxes at the top extreme right of the window. These three boxes represent different functions:
Minimise : It is used to minimise the current window. When the window is minimized, you can see its icon in the taskbar.
Maximise : Maximise button is used to maximise the window to the maximum possible size i.e. fit to screen.
Close : It is used to close the current window. When the window is closed, its icon does not appear in the taskbar.
Text editor In Windows 7
A text editor is a computer program which is used to edit the plain text. Notepad and MS- DOS Editor are commonly used text editors in Windows 7.
Shutting down Windows 7
The Start menu also has the Power option which gives us options to shut down the Computer, switch user, sleep, log off or restart a computer.
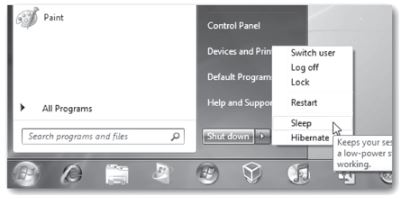
• Shut Down: It ends all current processes and shuts down the computer completely.
• Restart: This button reboots the computer. It saves the information to the hard drive, turns off the computer for a moment and then turns it back on again.
• Sleep: Clicking on this button puts the computer on low-power mode without turning it off.
• Hibernate: Clicking on this button switches off the computer but the applications remain active as and when you restart the computer.
Changing shape of Mouse pointer
Mouse pointer is one of the most important things in Windows which is used to select and open things. It is usually a white colour arrow, but its shape can be changed.
To Change the Shape of Mouse Pointer
1. In the Start Menu search box, type Mouse.
2. Then click on the Mouse search result.

OR
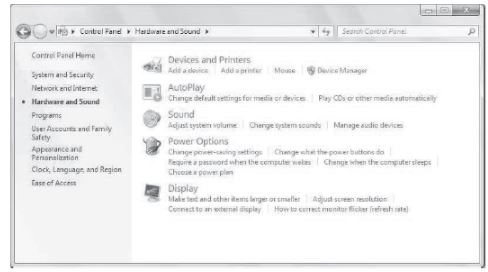
Open the Control Panel→Hardware and Sound→Devices and Printers Section→Mouse.
3. Mouse Properties window will open up.
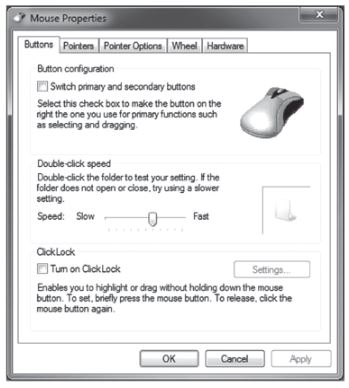
4. Click on the Pointers tab.
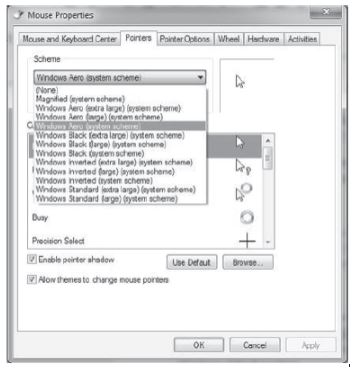
5. Click on the drop-down menu to see the other pointer sets built by default into Windows.
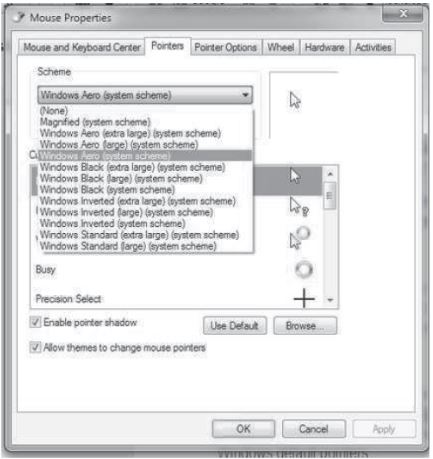
6. After choosing from one of the pre-installed mouse schemes, a display of the various cursor shapes that come with that set will appear. This will help you scroll through the possibilities and pick what you want.
7. The user can choose from the pre installed mouse schemes from the drop down list.
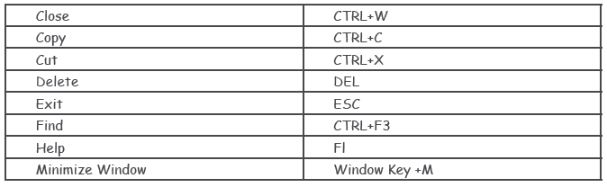
Some Important shortcut keys

CBSE Class 4 Computers Windows 7 Notes
Students can use these Revision Notes for Windows 7 to quickly understand all the main concepts. This study material has been prepared as per the latest CBSE syllabus for Class 4. Our teachers always suggest that Class 4 students read these notes regularly as they are focused on the most important topics that usually appear in school tests and final exams.
NCERT Based Windows 7 Summary
Our expert team has used the official NCERT book for Class 4 Computers to design these notes. These are the notes that definitely you for your current academic year. After reading the chapter summary, you should also refer to our NCERT solutions for Class 4. Always compare your understanding with our teacher prepared answers as they will help you build a very strong base in Computers.
Windows 7 Complete Revision and Practice
To prepare very well for y our exams, students should also solve the MCQ questions and practice worksheets provided on this page. These extra solved questions will help you to check if you have understood all the concepts of Windows 7. All study material on studiestoday.com is free and updated according to the latest Computers exam patterns. Using these revision notes daily will help you feel more confident and get better marks in your exams.
FAQs
You can download the teacher prepared revision notes for CBSE Class 4 Computer Science Windows 7 Notes from StudiesToday.com. These notes are designed as per 2026-27 academic session to help Class 4 students get the best study material for Computers.
Yes, our CBSE Class 4 Computer Science Windows 7 Notes include 50% competency-based questions with focus on core logic, keyword definitions, and the practical application of Computers principles which is important for getting more marks in 2026 CBSE exams.
Yes, our CBSE Class 4 Computer Science Windows 7 Notes provide a detailed, topic wise breakdown of the chapter. Fundamental definitions, complex numerical formulas and all topics of CBSE syllabus in Class 4 is covered.
These notes for Computers are organized into bullet points and easy-to-read charts. By using CBSE Class 4 Computer Science Windows 7 Notes, Class 4 students fast revise formulas, key definitions before the exams.
No, all study resources on StudiesToday, including CBSE Class 4 Computer Science Windows 7 Notes, are available for immediate free download. Class 4 Computers study material is available in PDF and can be downloaded on mobile.