
Download the latest CBSE Class 4 Computer Science MS Paint Notes in PDF format. These Class 4 Computers revision notes are carefully designed by expert teachers to align with the 2026-27 syllabus. These notes are great daily learning and last minute exam preparation and they simplify complex topics and highlight important definitions for Class 4 students.
Revision Notes for Class 4 Computers MS Paint
To secure a higher rank, students should use these Class 4 Computers MS Paint notes for quick learning of important concepts. These exam-oriented summaries focus on difficult topics and high-weightage sections helpful in school tests and final examinations.
MS Paint Revision Notes for Class 4 Computers
MS-Paint
• Microsoft Paint or ‘MS Paint’ is a basic graphics/painting utility that is included in all the Microsoft Windows versions.
• MS Paint can be used to draw, colour and edit pictures, including imported pictures for example, from a digital camera.
• MS Paint is found in the Windows start menu within the accessories folder.
• It can save creations in standard formats such as .jpg and .bmp
Partof MS-Paint Window
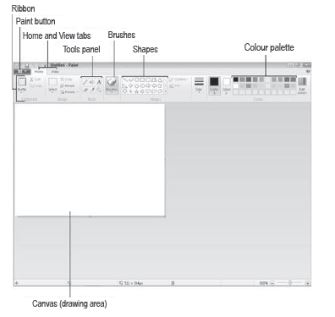
• Title Bar
Title Bar is the horizontal bar present at the top of the window. It holds the program name and the file name. For example, the on the previous page. Title Bar also holds Quick Launch Toolbar, Minimize button, Maximise button and Close Button.
• Paint Button
This button is situated just below the Quick Launch Toolbar. It gives us options to open, save and print a file.
• Canvas
Canvas is the actual drawing area where we can draw, colour and edit images. It is white in colour.
• Ribbon
Ribbon is a set of different groups that provides various tools to work on the Paint program. These groups are tools group, shapes group and colours group.
• Home Tab
For nearly everything you do, you’ll want the Home tab to be at the front. The Home tab contains the Ribbon, from which, tools and colours are selected. When you’re making use of the View tab, you can flick back and forth between Home and View as often as you need to.
Menu bar
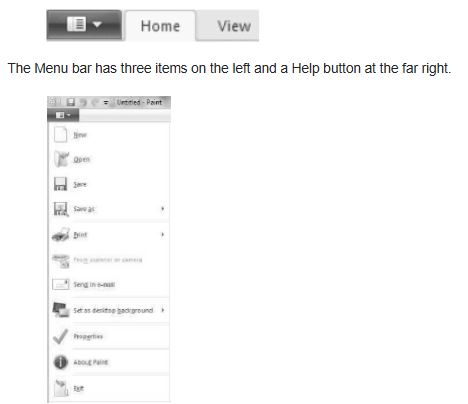
• First on the left is the Paint Button, which opens a very comprehensive menu, similar to that shown here, plus a list of pictures you have recently saved
• Most items are self-explanatory, but one-Save as- is very important if you ever want to save a cut out without losing the rest of your picture.
• You might like to take a quick look at some of the other items and investigate their uses as well.
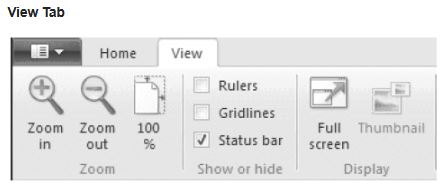
• Zooming in and out: It is one of the features of Paint in Windows 7 that has improved out of sight! Click on the View tab to bring it to the front and you’ll find a whole set of useful options available. These can be used alone or in combination with the Zoom Tool on the Ribbon or the slider on the Status Bar.
Zoom in and Zoom out tools can be clicked repeatedly to get a closer or more distant view.
• The 100% option: It is handy when you’ve finished working in a very zoomed–in view. One click and you’re back to normal.
• Rulers: These help to change the ruler to inches and centimeters.
• Gridlines: These are convenient, if you want to align shapes accurately.
• Status bar: On the show or hide part of this tab, you have the option of hiding the status bar.
• Full Screen: On the display section, you can click for full screen view. You can also get a full screen view by hitting F11. In either case, come back to a normal view by pressing the Esc key.
• Thumbnail: Thumbnail is only available when you are zoomed–in. It lets you see how changes you make are affecting your picture in normal view. Thumbnail cannot always show work on the far right or the bottom of the page.
You can flick back and forth between the Home tab and the View tab as often as you like.
MS-Paint tools
MS-Paint is an important program of Windows 7 which is used to draw, copy and edit pictures using various tools. Some of the tools of MS-Paint are:
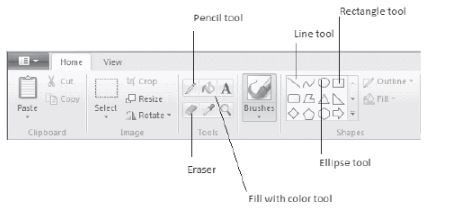
• Pencil tool: This tool works like a pencil and is used to draw free-form line.
• Fill with colour tool: This tool is used to fill in colour in the closed shape or picture. For this, we need to first make a shape in the drawing area and then select the colour of our choice to fill in the shape.
• Text tool: This tool is used to insert text inside the picture.
• Eraser tool: This tool is used to erase part of the picture by replacing it with the background colour.
• Colour Picker tool: This tool is used to pick colour from the picture and then use it for drawing.
• Magnifier tool: This tool is used to zoom in or zoom out a picture. The user can magnify the image by clicking on the view tab and then using zoom in or zoom out or 100% from zoom group.
• Line tool: It is used to draw straight lines of different thickness.
• Rectangle too: It is used to draw rectangle and square shapes.
• Ellipse tool: It is used to draw ovals and circles.
• Curve tool: It is used for drawing a curve.
• Polygon tool: It for drawing a polygon but still you can draw a lot of other objects.
• Rounded rectangle tool: This tool helps you to draw a rectangle with rounded corners.
Selection tools
We select the picture with the help of the selection tools. This is done by using the ‘Select’ from the home Ribbon. There are two types of selection tools in MS-Paint. These are:
1. Rectangular selection: This is used to select a rectangular area by drawing on the drawing area.
2. Free-form selection: This is used to select an area of any shape by drawing on the drawing area.
To select a picture using free-form selection,
• Click the drop-down arrow of the Select button. A list showing selection shapes and selection options will appear.
• Click on the Free-form Selection.
• Click the left mouse button and drag the mouse over the area that you wish to select.
When you release the mouse, your selection will have dotted box around it.
Brush’s in MS – Paint
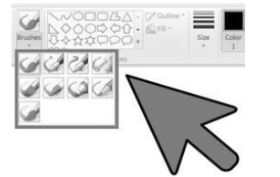
Brushes in Paint are a very useful tool. It comes in different sizes. Brushes are used to draw images in Paint. The various brushes in Paint are Calligraphy brush 1, Calligraphy brush 2,
Airbrush, Oil brush, Crayon, Marker, Natural pencil and Water colour brush.
• Calligraphy brush 1: It starts with thin stroke and gets thick.
• Calligraphy brush 2: It starts with thick stroke and gets thin.
• Airbrush: It helps to create drawings with tiny droplets which will give the same effect as airbrush colouring.
• Oil brush: It is a stiff hair brush which is used for oil paintings.
• Crayon: It is used to give impression of crayon drawing.
• Marker: It is used to create paintings with fine lines and bold strokes.
• Natural Pencil: It is like the pencil which is used to draw simple drawings.
• Watercolour brush: It is used to create watercolour effects drawing.
Colours Group
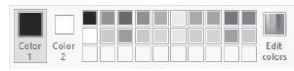
The colours group has many different colours. To select a colour, first click on the Color 1 option and then choose the colour of your choice.
How to fill in the colour?
1. From the Shapes Group, choose the shape you want to draw (Let suppose oval). Draw the shape in the canvas.
2. From the Tools Group, choose the Fill with Colour option.
3. Click Colour 1 in the Colours Group. Choose the colour (Let suppose blue) and fill up the shape by pressing left mouse button in it.
Shapes Group

Shapes Group consists of many tools that can be used to draw different shapes. These shape tools are line tool, curve tool, oval tool, rectangle tool, rounded rectangle tool, polygon tool, triangle tool, diamond tool, arrow tools, star tools, callout tools, heart tool and lightening tool etc.
By choosing a given shape tool, we can draw the image on the canvas.
Steps to draw a shape:
1. Choose a tool of your choice.
2. Move the mouse cursor to the canvas.
3. Now, click on the left mouse button and keeping it pressed, drag mouse to draw the shape.
Copying and Moving Pictures
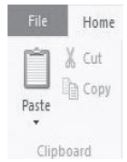
Follow the below given steps to cut or copy an image:
1. Select the image by using the selection tools.
2. If we want to remove the selected image from its original position, we use the option of ‘Cut’. But if we wish to create a duplicate of the selected image, we use the option of ‘Copy’.
3. Cut, Copy and Paste options are present in the Clipboard group of the Ribbon.
4. Click on the Paste option. The selected image gets pasted at the top left hand corner of the canvas. With the help of the mouse, we can drag the image wherever we wish to in the canvas.
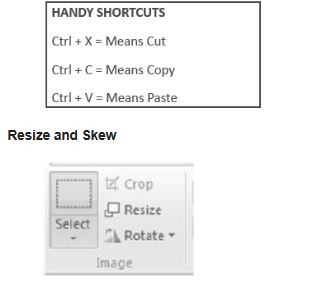
Resize feature of MS-Paint allows us to change the size of any image. By clicking on the Resize option in the Image Group, you can increase or decrease the size of the image by changing the parameters (percentage or pixels).
Skew feature of MS-Paint allows shifting the image at an angle. It can be done by changing the degrees of angles you want to shift your image.
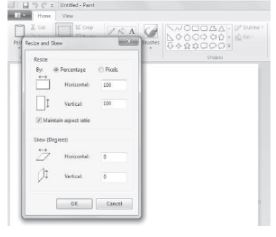
Steps to Resize and Skew an Image
1. Draw an image.
2. Select it by using selection tools.
3. From the image group, click on Resize option. The Resize and Skew dialog box opens.
4. Change the parameters on the basis of whether you want to resize or skew the image.
5. Click OK. See the changes in the image.
Rotate and fliP
In the Image group, just below the Resize option, is the option of Rotate. This option is used to rotate or flip an image.
Rotate option is used to move an image clockwise or anticlockwise.
Flip option is used to flip an image vertically or horizontally.

Steps to Rotate / Flip an Image
1. Draw an image.
2. Select the image using selection tools.
3. Click on the rotate option. A dialog box appears with various options.
4. Choose the rotate or flip option you want for your image.
Tux Paint
• It is a simple drawing program for children and tux paint mascot is penguin.
• Tux Paint is completely free software, released as “Open Source” software. This means you may download it and install it on as many machines as you wish, copy it for friends and family, and give it to your local schools.
• Tux Paint runs on most systems, but check the requirements if you’re unsure whether your system can support it.
Magic Tools of Tux Paint
• Color Shift : Modifies the colors in the image.
• Edges : Traces the edges of the image, over a white background.
• Color and White : Turns image pure color & white (no grey or color).
• Snow Ball : Places random snow balls over the image.
• Snow Flake : Places random snowflakes over the image.
• Noise : Adds random noise to the image.
• Mosaic : Gives the image a mosaic effect.
• Rain : Adds rain drops to the image.
• Toothpaste : Squirts “toothpaste” on to the image.
• Rails : This tool is used to trace the edge of the image over a white background; example: draws train tracks.
Some Important keyboard
Paint comes with a number of keys which you can use to work faster. These keyboard shortcuts are as follows:
• F11: View a picture in full-screen mode.
• F12: Save the picture as a new file.
• Ctrl + A: Select the entire picture
• Ctrl + B: Bold selected text (when using the text tool).
• Ctrl + C: Copy the selection to the clipboard.
• Del : Delete the selection.
• Ctrl + E: Open the Image Properties dialog box where you can adjust the dimensions of the image.
• Ctrl + G: Show or hide gridlines.
• Ctrl + I: Italicize selected text (when using the text tool).
• Ctrl + N: Create a new picture.
• Ctrl + O: Open an existing picture.
• Ctrl + P: Print a picture.
• Ctrl + R: Show or hide the ruler
• Ctrl + S: Save changes to a picture
• Ctrl + U: Underline selected text (when using the text tool).
• Ctrl + V: Paste a selection from the Clipboard.
• Ctrl + W: Open the Resize and Skew dialog box.
• Ctrl + X: Cut a selection.
• Ctrl + Y: Redo a change.
• Ctrl + Z: Undo a change.
• Ctrl + plus (+): Increase the width of a brush, line, or shape outline by one pixel.
• Ctrl + minus (-): Decrease the width of a brush, line, or shape outline by one pixel.
• Ctrl + Page Up: Zoom in.
• Ctrl + Page Down: Zoom out.
• Alt or F10: Display key tips
• Alt + F4: Close a picture and its Paint window.
• Right arrow: Move the selection or active shape right by one pixel
• Left arrow: Move the selection or active shape left by one pixel.
• Down arrow: Move the selection or active shape down by one pixel.
• Up arrow: Move the selection or active shape up by one pixel.
• Shift + F10: Show the current shortcut menu / context menu
• Ctrl + F1: Expand or collapse the Ribbon
CBSE Class 4 Computers MS Paint Notes
Students can use these Revision Notes for MS Paint to quickly understand all the main concepts. This study material has been prepared as per the latest CBSE syllabus for Class 4. Our teachers always suggest that Class 4 students read these notes regularly as they are focused on the most important topics that usually appear in school tests and final exams.
NCERT Based MS Paint Summary
Our expert team has used the official NCERT book for Class 4 Computers to design these notes. These are the notes that definitely you for your current academic year. After reading the chapter summary, you should also refer to our NCERT solutions for Class 4. Always compare your understanding with our teacher prepared answers as they will help you build a very strong base in Computers.
MS Paint Complete Revision and Practice
To prepare very well for y our exams, students should also solve the MCQ questions and practice worksheets provided on this page. These extra solved questions will help you to check if you have understood all the concepts of MS Paint. All study material on studiestoday.com is free and updated according to the latest Computers exam patterns. Using these revision notes daily will help you feel more confident and get better marks in your exams.
FAQs
You can download the teacher prepared revision notes for CBSE Class 4 Computer Science MS Paint Notes from StudiesToday.com. These notes are designed as per 2026-27 academic session to help Class 4 students get the best study material for Computers.
Yes, our CBSE Class 4 Computer Science MS Paint Notes include 50% competency-based questions with focus on core logic, keyword definitions, and the practical application of Computers principles which is important for getting more marks in 2026 CBSE exams.
Yes, our CBSE Class 4 Computer Science MS Paint Notes provide a detailed, topic wise breakdown of the chapter. Fundamental definitions, complex numerical formulas and all topics of CBSE syllabus in Class 4 is covered.
These notes for Computers are organized into bullet points and easy-to-read charts. By using CBSE Class 4 Computer Science MS Paint Notes, Class 4 students fast revise formulas, key definitions before the exams.
No, all study resources on StudiesToday, including CBSE Class 4 Computer Science MS Paint Notes, are available for immediate free download. Class 4 Computers study material is available in PDF and can be downloaded on mobile.