
Download the latest CBSE Class 4 Computer Science MS Word 2010 Notes in PDF format. These Class 4 Computers revision notes are carefully designed by expert teachers to align with the 2026-27 syllabus. These notes are great daily learning and last minute exam preparation and they simplify complex topics and highlight important definitions for Class 4 students.
Revision Notes for Class 4 Computers MS Word 2010
To secure a higher rank, students should use these Class 4 Computers MS Word 2010 notes for quick learning of important concepts. These exam-oriented summaries focus on difficult topics and high-weightage sections helpful in school tests and final examinations.
MS Word 2010 Revision Notes for Class 4 Computers
Microsoft Word
Microsoft Word or MS-Word is a word processor program. It has been developed by Microsoft Corporation. It is a part of MS-Office program.
Parts of Ms-Word 2010 Window
Following is the basic window which we see when we start the Word application. Let us understand the various important parts of this window.
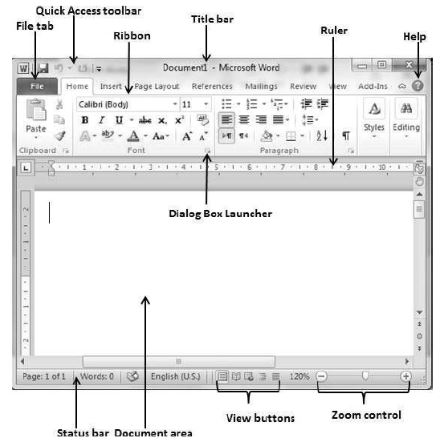
File Tab
• The File tab replaces the Office button from Word 2007.
• This is where we come when we need to open or save files, create new documents, print a document, and do other file-related operations.
• We can click it to check the Back-stage view.
Quick Access Toolbar
• This toolbar is just above the File tab.
• This is a convenient resting place for the most frequently used commands in Word.
• We can customize this toolbar based on our comfort.
Ribbon
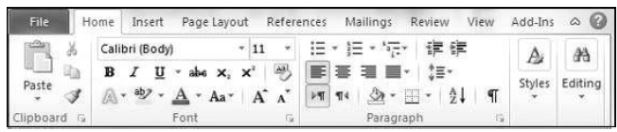
Ribbon contains commands organized in three components:
Tabs
• These appear across the top of the Ribbon and contain groups of related commands. Homes, Insert, Page Layout are examples of ribbon tabs.
Groups
• They organize related commands; each group name appears below the group on the Ribbon.
• For example, group of commands related to fonts or group of commands related to alignment, etc.
Commands
• Commands appear within each group as mentioned above.
Title Bar
• This title bar lies in the middle and at the top of the window.
• Title bar shows the program and document titles.
Ruler
To see the rulers, choose View and select the Ruler check box. Rulers are of two types:
• Horizontal Ruler: The horizontal ruler appears just beneath the Ribbon and is used to set margins and tab stops.
• Vertical Ruler: The vertical ruler appears on the left edge of the Word Window and is used to gauge the vertical position of elements on the page.
Help
• The Help Icon can be used to get word related help anytime we like.
Zoom Control
• The zoom control consists of a slider that we can slide left or right to zoom in or out; we can click the + buttons to increase or – buttons to decrease the zoom factor.
View Buttons
• The group of five buttons located to the left of the Zoom control, near the bottom of the screen, lets us switch through the Word’s various document views.
Print Layout View
• This displays pages exactly as they will appear when printed.
Full Screen Reading View
• This gives a full screen view of the document.
Web Layout View
• This shows how a document appears when viewed by a Web browser, such as Internet Explorer.
Outline View
• We work with outlines using Word’s standard heading styles.
Draft View
• This formats text as it appears on the printed page with a few exceptions.
• For example: headers and footers aren’t shown.
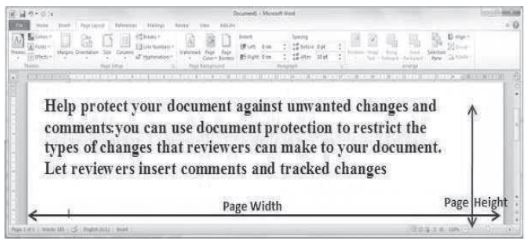
Document Area
• Document area is the area where we type.
• The flashing vertical bar is called the insertion point and it represents the location where text appears when we type.
Status Bar
• Status displays the document information as well as the insertion point location.
• From left to right, this bar contains the total number of pages and words in the document, language, etc.
• We can configure the status bar by right-clicking anywhere on it and by selecting or deselecting options from the provided list.
Dialog Box Launcher
• Dialog box launcher appears as very small arrow in the lower-right corner of many groups on the Ribbon.
• Clicking this button opens a dialog box or task pane that provides more options about the group.
Erasing a Text in MS Word
Apart from the typing work, MS-Word also provides options of editing. While working on a document, it is possible that you might make a mistake. For correction of such mistakes, we can use one of the following keys:
• Backspace Key: This key will erase the letters/words on the left side of the cursor.
• Delete Key: This key will erase the letters/words on the right side of the cursor.
• Home key: This key is used to bring the typing cursor to the beginning of the line in which you are currently typing.
• End key: This key is used to bring the cursor to the end of the line in which you are currently typing.
Selecting Text
We can select the typed text either with the help of a mouse or a keyboard.
Using a Mouse
• To select a single word, double click on it.
• To select a sentence, press Ctrl key from the keyboard and click at any point of the sentence.
• To select a paragraph, click three times at any point in the paragraph.
• To select all the text,
1. Click on the editing group of the ribbon and choose Select. From the drop-down window, choose Select All.
2. Click three times in the selection bar.
3. Drag the mouse by pressing the left button. Leave the button when you are done with the entire selection.
Using a Keyboard
• To select a single word, keep the cursor at one end of the word and using the arrow keys, move the cursor to the other end.
• To select a sentence/paragraph, keep the cursor at the starting of the sentence. Press Shift+ down Key/End key till the end of the word you want to select.
• To select all the text, press ‘Ctrl + A’.
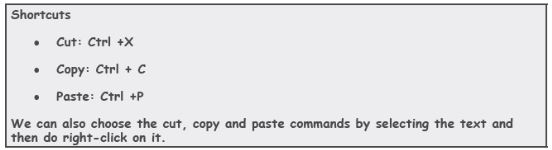
Cut – Copy and Paste Commands
The Cut, Copy and Paste commands are present in the clipboard group of the Home Tab in the Ribbon.
• Copy and Paste
Using the copy command, we can copy the selected text and then paste it in other part of the Word document using the Paste command.
• Cut and Paste
Using the cut command, we can erase the selected text from one part of the document and paste it in other part of the Word document using the Paste command.
Formatting
• The word formatting means to change the way our text appears. It includes organising and arranging text in a particular format.
• Formatting is a part of editing a document.
• MS-WORD 2010 enables us to make changes in the organisation of the text appropriately.
• The various formatting tools of MS-Word are available in the various groups of MS-Word Ribbon.
Spell check
A document looks professional, if it does not have any grammatical and spelling errors. Ms-
Word gives us option to check spellings in our document.
To check spellings in MS-word,
1. Click on Review tab.
2. Click on the Spelling & Grammar command. A Spelling and Grammar dialog box appears.
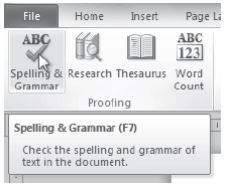
3. For each error, MS Word gives few suggestions. We can choose one of the suggestions and click on change to correct the error. However, if there is not an error, you can click on Ignore.
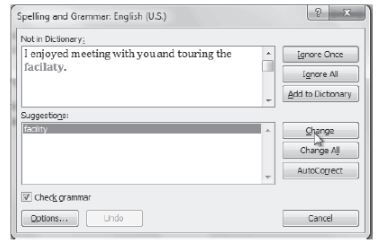
4. In case, no suggestions are provided, you can manually type the correct spelling.
Printing a Ms Word document
1. Open an existing word document to be printed.
2. Click on File.
3. From the Menu, click on the Print. ‘Print dialogue box’ will appear.
4. Choose the number of copies you want for the document.
5. Click on Print. The document will undergo printing.
Following are the simple steps to add page numbers in a Word document.
Step 1 : Click the Insert tab, and click the Page Number button available in the header and footer section. This will display a list of options to display the page number at the top, bottom, current position, etc.
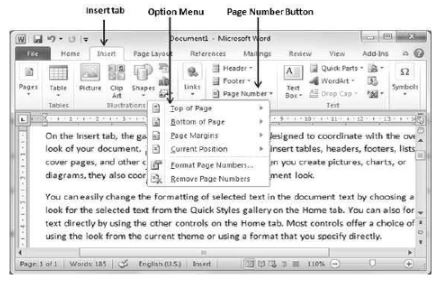
Step 2 : When you move your mouse pointer over the available options, it displays further styles of page numbers to be displayed. For example, when I take the mouse pointer at the Bottom of Page option, it displays the following list of styles.
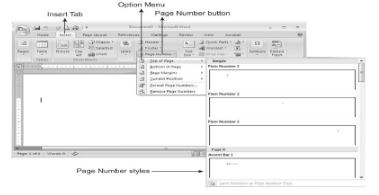
Step 3 : Finally, select any one of the page number styles. Click the Close Header and Footer button to come out of the Footer Edit mode.
To change the case of selected text in a document, do the following:
1. Select the text for which you want to change the case.
2. On the Home tab, in the Font group, click Change Case (Aa).
3. To capitalize the first letter of a sentence and leave all other letters as lowercase, click Sentence case.
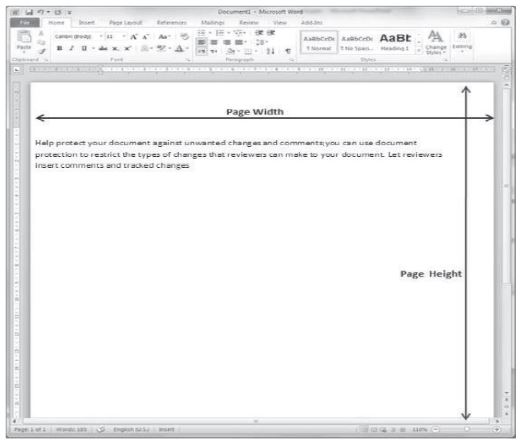
Working With Page layout:
Page layout in Ms Word 2010 is very useful when you print your pages. By default, Microsoft Word shows a page in portrait orientation and in this case the width of the page is less than the height of the page; the page will be 8.5 inches × 11 inches.
You can change the page layout from portrait to landscape orientation. In such case, the width of the page will be more than the height of the page and page will be 11 inches × 8.5 inches.
Change Page layout
The following steps will help you understand how to change the page layout of a word document.
Step 1: Open the Word document the orientation of which needs to be changed.
Click on the Page Layout tab, and click the Orientation button available in the Page Setup group. This will display an Option Menu having both the options (Portrait & Landscape).
By default, page layout will be of Portrait Orientation as shown below.
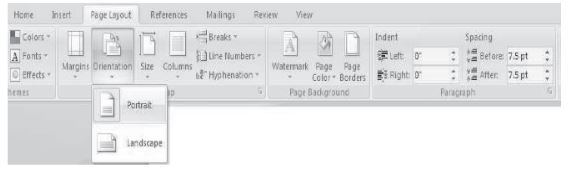
Step 2 : Click the options you want to set to orientation. Because our page is already in portrait orientation, we will click the Landscape option to change the page layout to landscape
orientation.
Exploring styles and themes group
• Styles and themes are powerful tools in Word that can help you easily create professional looking documents.
• A style is a predefined combination of font style, colour, and size of text that can be applied to selected text.
• A theme is a set of formatting choices that can be applied to an entire document and includes theme colours, fonts, and effects.
To Select a style
1. Select the text you want to format.

2. In the Style group on the Home tab, hover over each style to see a live preview in the document. Click the More drop-down arrow to see additional styles.
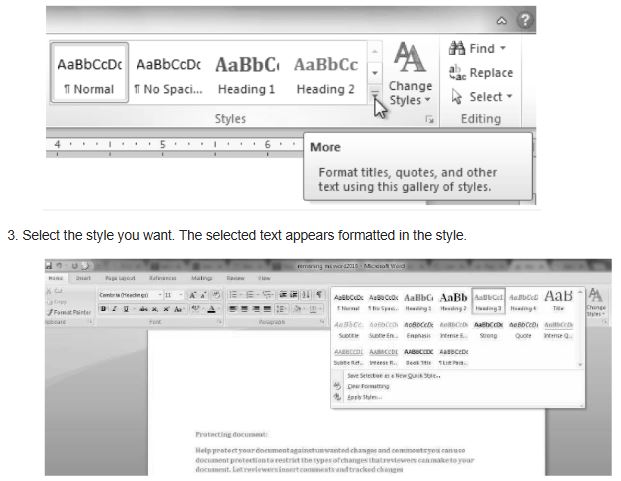
To apply a style set
Style sets include a combination of title, heading, and paragraph styles. Style sets allow you to format all of the elements of your document at once, rather than formatting your title and headings separately.
1. Click the Change Styles command on the Ribbon. A drop-down menu will appear.
2. From the drop-down menu, select Style Set.
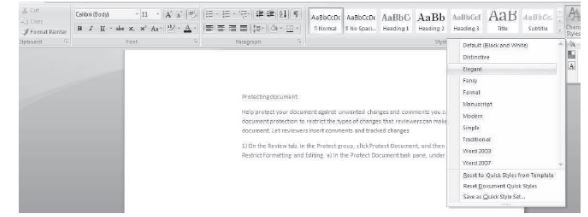
3. Select the Style Set you want and the change will be reflected in the entire document.
Some Important short keys
• Ctrl+W: Close the active window/document.
• Ctrl+Z : Undo an action.
• Ctrl+Y : Redo the last action or repeat an action.
• Ctrl+S : Save a document.
• Ctrl+P : Print a document.
• Ctrl+K : Insert a hyperlink.
• Alt+Left : Arrow Goes back one page.
• Alt+Right : Arrow Goes forward one page.
• Ctrl+C : Copes selected text or graphics to the Office Clipboard.
• Ctrl+V : Paste the most recent addition to the Office Clipboard.
• Ctrl+Shift+A : Format all letters as capitals.
• Ctrl+B : Applies or removes bold formatting.
• Ctrl+I : Applies or removes italic formatting.
• Ctrl+= : Apply subscript formatting (automatic spacing).
CBSE Class 4 Computers MS Word 2010 Notes
Students can use these Revision Notes for MS Word 2010 to quickly understand all the main concepts. This study material has been prepared as per the latest CBSE syllabus for Class 4. Our teachers always suggest that Class 4 students read these notes regularly as they are focused on the most important topics that usually appear in school tests and final exams.
NCERT Based MS Word 2010 Summary
Our expert team has used the official NCERT book for Class 4 Computers to design these notes. These are the notes that definitely you for your current academic year. After reading the chapter summary, you should also refer to our NCERT solutions for Class 4. Always compare your understanding with our teacher prepared answers as they will help you build a very strong base in Computers.
MS Word 2010 Complete Revision and Practice
To prepare very well for y our exams, students should also solve the MCQ questions and practice worksheets provided on this page. These extra solved questions will help you to check if you have understood all the concepts of MS Word 2010. All study material on studiestoday.com is free and updated according to the latest Computers exam patterns. Using these revision notes daily will help you feel more confident and get better marks in your exams.
FAQs
You can download the teacher prepared revision notes for CBSE Class 4 Computer Science MS Word 2010 Notes from StudiesToday.com. These notes are designed as per 2026-27 academic session to help Class 4 students get the best study material for Computers.
Yes, our CBSE Class 4 Computer Science MS Word 2010 Notes include 50% competency-based questions with focus on core logic, keyword definitions, and the practical application of Computers principles which is important for getting more marks in 2026 CBSE exams.
Yes, our CBSE Class 4 Computer Science MS Word 2010 Notes provide a detailed, topic wise breakdown of the chapter. Fundamental definitions, complex numerical formulas and all topics of CBSE syllabus in Class 4 is covered.
These notes for Computers are organized into bullet points and easy-to-read charts. By using CBSE Class 4 Computer Science MS Word 2010 Notes, Class 4 students fast revise formulas, key definitions before the exams.
No, all study resources on StudiesToday, including CBSE Class 4 Computer Science MS Word 2010 Notes, are available for immediate free download. Class 4 Computers study material is available in PDF and can be downloaded on mobile.