
Download CBSE Class 10 Computer Science Digital Documentation Advanced in PDF format. All Revision notes for Class 10 Computer Science have been designed as per the latest syllabus and updated chapters given in your textbook for Computer Science in Class 10. Our teachers have designed these concept notes for the benefit of Class 10 students. You should use these chapter wise notes for revision on daily basis. These study notes can also be used for learning each chapter and its important and difficult topics or revision just before your exams to help you get better scores in upcoming examinations, You can also use Printable notes for Class 10 Computer Science for faster revision of difficult topics and get higher rank. After reading these notes also refer to MCQ questions for Class 10 Computer Science given on studiestoday
Revision Notes for Class 10 Computer Science Digital Documentation Advanced
Class 10 Computer Science students should refer to the following concepts and notes for Digital Documentation Advanced in Class 10. These exam notes for Class 10 Computer Science will be very useful for upcoming class tests and examinations and help you to score good marks
Digital Documentation Advanced Notes Class 10 Computer Science
CREATE AND APPLY STYLE IN THE DOCUMENT
Style refers to a pre-defined set of formatting attributes that can be applied to text, paragraphs, pages, and other elements of a document. Styles help to ensure consistency in formatting throughout the document and make it easier to manage and modify the document’s formatting.
Advantages of Style
• Provides consistency throughout the document
• Saves time and increases efficiency
• Allows for easy updates and modifications
• Makes document management simpler and more organized
• Enhances accessibility for readers who use assistive technologies.
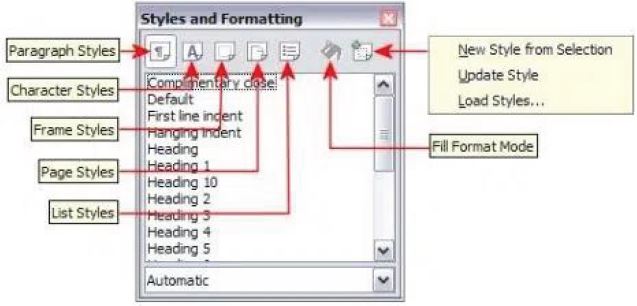
There are several types of styles in OpenOffice, including:
• Character styles: These are used to apply formatting to specific characters or words within a paragraph. For example, you might use a character style to make a particular word bold or italicized.
• Paragraph styles: These are used to apply formatting to entire paragraphs, including text alignment, spacing, and indentation.
• Page styles: These are used to define the layout and formatting of individual pages, including margins, headers, and footers.
• List styles: These are used to define the formatting of bulleted or numbered lists.
• Frame styles: These are used to define the formatting of frames, which are used to hold graphics or other elements within a document.
• Table styles: These are used to define the formatting of tables, including cell borders, backgrounds, and text alignment.
• Graphics styles: These are used to define the formatting of graphics or images within a document, including borders, backgrounds, and text wrapping.
How to Apply Style in OpenOffice.org
Step 1 : Select the text, paragraph, or other element where you want to apply the style.
Step 2 : Click Format > Style and Formatting or press F11
Step 3 : Select any one of the style (e.g., Paragraph, Character, etc.)
What is Fill Format Mode and How to apply
Fill Format Mode is a feature in OpenOffice that allows you to copy the formatting from one element of a document and apply it to another element. This can be useful when you want to quickly apply consistent formatting to multiple elements within a document.
How to Apply Fill Format Mode
Step 1 : Select the element that contains the formatting you want to copy.
Step 2 : Click on the “Fill Format mode” icon in the Style and Formatting window.
Step 3 : Select the element or elements that you want to apply the formatting to.
Step 4 : Click on the element that you want to apply the formatting.

Creating New Custom Style in OpenOffice.org
There are two diffierent ways to create a Style
1) Creating a new Style from a selection
2) Dragging and Dropping to Create A Style
Create New Style from Selection
By replicating an existing manual format, you can make a new style. This new style will only be applied to this document and will not be saved in the template.
Step 1 : Select the formatted text or paragraph.
Step 2 : From the top menu, select “Styles” > “New Style” (or press F11).
Step 3 : In the New Style window, enter a name for the new style and select the type of style you want to create.
Step 4 : Make any additional changes to the style options.
Step 5 : Click “OK” to save the new style.
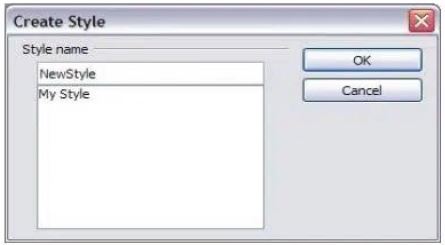
Drag and Drop to create New Style
You can drag and drop a text selection into the Styles and Formatting window to create a new style.
Step 1 : Open the Styles and Formatting window.
Step 2 : Select text and drag it to the Styles and Formatting window.
Step 3 : In the Create Style dialog box, type a name for the new style. The list shows the names of existing custom styles of the selected type, if any. Click OK to save the new style.
Step 4 : If the Paragraph Styles list is showing in the Styles and Formatting window, a new paragraph style will be added to the list. If Character Styles are active, the character style will be added to the list.
Modifying Custom or Pre defined Styles
There are two different ways to modify Style in OpenOffice –
• Updating a style from a selection •
• Load or copy styles from another document or template
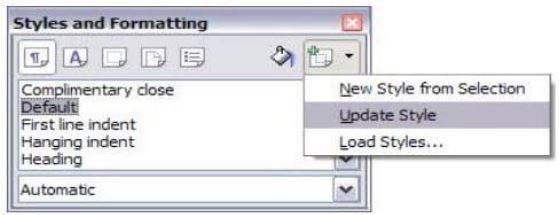
Updating a Style from a selection
To update a style from a selection:
Step 1 : Open the Styles and Formatting window.
Step 2 : In the document, select an item that has the format.
Step 3 : In the Styles and Formatting window, select the style you want to update (singleclick, not double-click), then long-click on the arrow next to the New Style from Selection icon and click on Update Style.
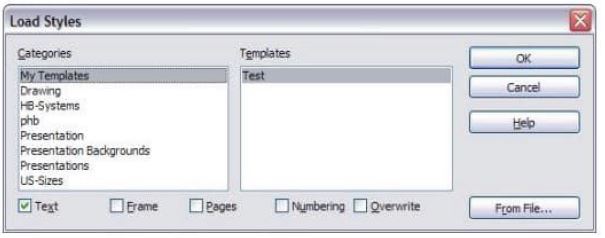
Load or copy styles from another document or template
You can copy styles by loading them from a template or another document:
Step 1 : Open the document into which you wish to paste styles.
Step 2 : Long-click on the arrow next to the New Style from Selection symbol in the Styles and
Formatting window, and then select Load Styles.
Step 3 : Locate and choose the template you wish to copy styles from on the Load Styles box.
Step 4 : Decide which style categories should be duplicated.
Step 5 : Click OK to copy the styles.
How to Insert and use Image in Digital Document
There are various ways to insert images into a document, including via the Drag and Drop, Insert Image from File, Insert Image from Clipboard, Open Office Gallery, and a scanner.
1. Drag and Drop
2. Insert Image from Dialog Box
3. Insert Image from Clipboard
4. Insert Image from Gallery
5. Insert Image from Scanner
Drag and Drop
To drag an image file into a digital document, follow these steps: –
Step 1 : Open a File browser window and locate the image you want to insert.
Step 2 : Drag the image into the Writer document and drop it where you want.
Insert Image from Dialog Box
To insert an image file into a digital document, follow these steps –
Step 1: Click in the Open Office document in the first step to place the image there.
Step 2: From the menu bar, select Insert > Picture > From File.
Step 3: Navigate to the file that needs to be inserted on the Insert Picture dialogue, select it, and click Open.
Insert Image from Clipboard
Step 1 : Open the document in which you want to insert the image.
Step 2 : Place the cursor where you want the image to be inserted.
Step 3 : Press “Ctrl+V” or right-click and select “Paste” to insert the image from the clipboard.
Step 4 : Resize or move the image as necessary.
Insert Image from Gallery
Step 1 : Open the document in which you want to insert the image.
Step 2 : From the top menu, select “View” > “Gallery” (or press F6).
Step 3 : In the Gallery window that appears, browse through the categories to find the image you want to insert.
Step 4 : Click on the image to select it.
Step 5 : Click and drag the selected image into the document where you want it to appear.
Insert Image from Scanner
If your computer has a scanner attached, Open Office may access the scanning software and enter the scanned item as an image into the Open Office document. To insert image
Click the area where the image to be placed, then choose Insert > Picture > Scan > Select Source to begin the process.
Modifying Image in OpenOffice.org
You might need to edit a new image you include so that it matches the document. Here, we’ll go through how to use the Picture toolbar, as well as how to resize, crop, and rotate a photo using a workaround.
Picture Toolbar
The Picture toolbar displays when you insert a picture or choose one that is already in the page. View > Toolbars > Picture allows you to set it to always be visible.
Graphics mode
You can change color images to grayscale by selecting the image and then selecting Grayscale from the Graphics mode list.
Flip vertically or horizontally
Select the image, then click the corresponding icon to turn it vertically or horizontally.
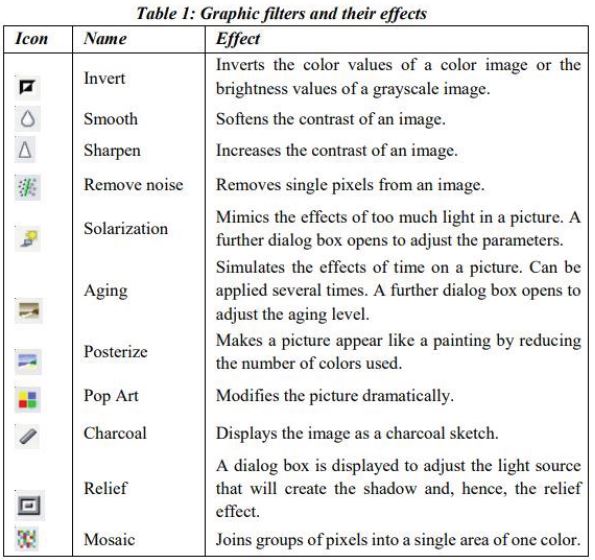
Filters
The filters are briefly described in the following table, but the best way to comprehend them is to use them. Try around with the various filters and their settings.
Transparency
To make a picture more transparent, change the percentage value in the Transparency box on the Picture toolbar. When making a watermark or enclosing the image in the background.
Using The Formatting Toolbar And Picture Dialog
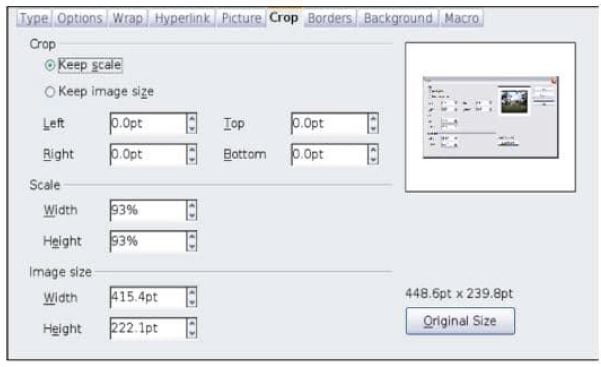
a. Cropping Images
You could want to crop (cut off) a portion of the image if you’re only interested in it for your document. Right-click the image and choose Picture from the pop-up menu to begin cropping it.
b. Keep scale / Keep image size
When the Keep scale option is used (the default), cropping an image does not alter its scale.
When the option to Keep Picture Size is used, cropping results in either an increase in image size (for positive cropping values), a decrease in image size (for negative cropping values), or an image distortion.
c. Width and Height
As you input values in the Left, Right, Top, and Bottom fields under Scale or Image size, the Width and Height fields change. To find the precise amount to crop by, use the thumbnail next to these fields.
d. Resizing an Image
If the inserted image is too big or too small, it might not fit into the paper completely. You can resize the image in Writer.
e. Rotating a Picture
With the aid of the rotation option in digital documentation, you can rotate the image.
f. Creating Drawing Objects
Display the Drawing toolbar by selecting View > Toolbars > Drawing to start utilising the drawing tools.
CREATE AND USE TEMPLATE
A template is a sample that you can follow while writing new documents. Documents that have previously been designed are called templates. Simply substitute your own text for the sample text.
Creating a Template
You can create your own templates in two ways:
• from a document,
• and using a wizard.
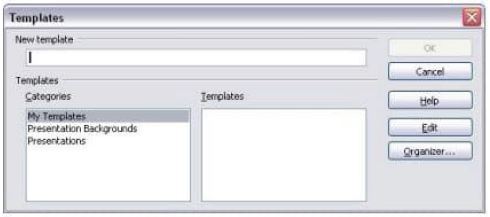
Creating A Template From A Document
Step 1 : Open a new or existing document of the type you want to make into a template (text document, spreadsheet, drawing, presentation).
Step 2 : Add the content and styles that you want.
Step 3 : From the main menu, choose
File > Templates > Save.
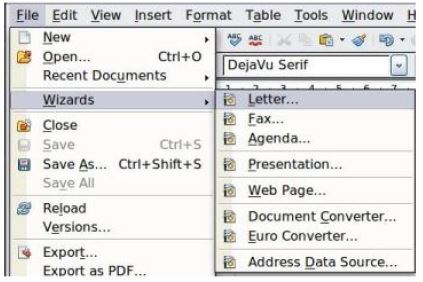
Creating A Template Using A Wizard
Step 1 : Choose File > Wizards >[type of template required]
Step 2 : Follow the instructions on the pages of the wizard like the date, subject line , salutation, and complimentary close
Step 3 : In the last section of the wizard, you can specify the name and location for saving the template.
Step 4 : Finally, you have the option of creating a new document from your template immediately, or manually changing the template.
CREATE AND CUSTOMIZE TABLE OF CONTENTS
A table of contents (TOC) is a list of the main sections or chapters in a document, a table of contents gives readers a quick summary of the document’s content and a mechanism to quickly search for a specific piece of information within it. The table of contents typically includes section or chapter titles and the corresponding page numbers.
Advantages of Table of Content
• Provides quick navigation
• Efficient organization
• Improved comprehension
• Professional appearance
• Accessibility for readers with disabilities
What is the purpose of Table of Content
1. It provides users with a summary of the contents and structure of the document.
2. It enables users to jump right to a certain area of a document.
How to Insert Table of Content in Digital Documentation
To insert table of Content in Digital Document follow the following link – Insert > Indexes and Tables > Indexes and Tables.
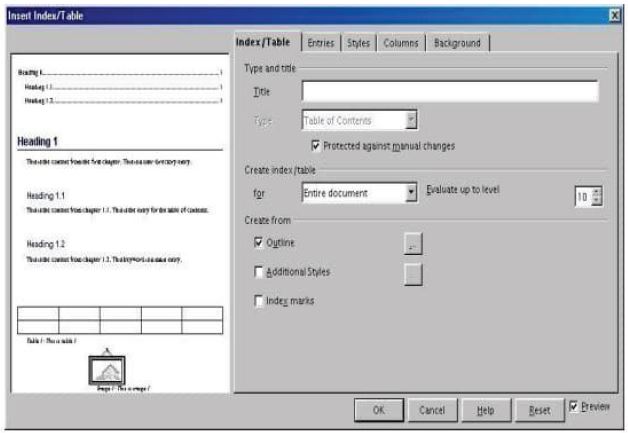
Basic Setting in Table of Content
Adding A Title
Put a title in the Title area if you want one for the table of contents. (If Writer automatically entered a title in this field, you may edit it by typing over the value.) Clear the Title field to remove the title.
Protecting Against Manual Changes
Select the Protected against manual changes checkbox to prevent accidental changes to the table of contents.
• If this box is checked, the context menu or the Insert Table/Index window are the only ways to modify the table of contents.
• If this box is unchecked, The table of contents can be modified immediately on the document page, just like regular text..
Changing The Number Of Levels
When creating the table of contents, Writer by default considers 10 levels of headings. Enter the required number in the “Evaluate up to level” spin box to adjust the number of levels examined.
Assigning Custom Styles
All paragraphs created using the default heading styles are automatically assigned to the table of contents by Writer (Heading 1, Heading 2, and so on).
Using The Entries Tab
Entries table help to customize the formatting of the TOC entries. This tab allows you to specify how the headings and subheadings in the document should appear in the TOC, including the font, style, indentation, and page number formatting.
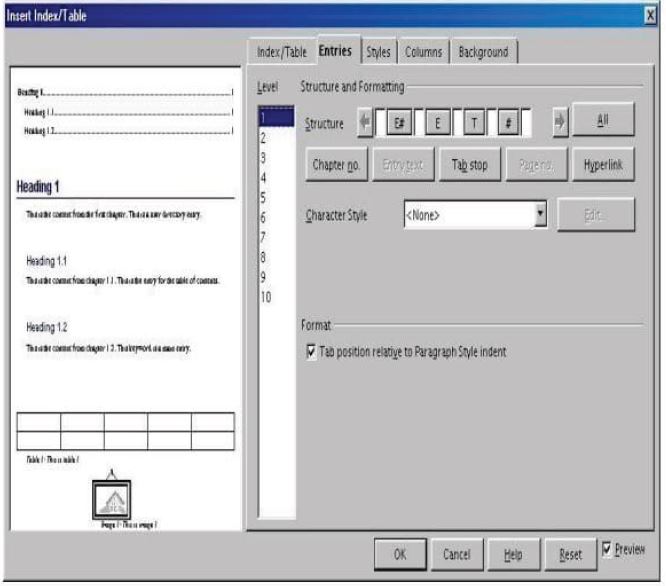
• E# – The chapter number is indicated by the E# button.
• E – The entered text is represented by the E button.
• T – A tab stop is represented by the T button.
• # – The page number is indicated by the # button.
• LS – The beginning of a hyperlink is indicated by the LS button. (This button is absent from the Structure line by default.)
• LE – A hyperlink’s conclusion is indicated by the LE button. (This button is absent from the Structure line by default.)
Deleting Elements
Click the button next to the element you want to remove from the Structure line, and then press the Delete key on your computer. For instance, click the T button and then press the Delete key to remove a tab stop.
Using The Background Tab
To add colour or a graphic to the table backdrop, use the Background tab.
Saving The Table Of Contents
Click OK to save the table of contents and have it display in your document. The table of contents is
displayed in your document once the Insert Index/Table window closes.
IMPLEMENT MAIL MERGE
Using a mail merge, you can personalise a letter you’ve already written and send it to a large group of recipients, giving the impression that you wrote it specifically for them. A mail merge can also be a rapid technique to create labels or envelopes with the addresses for various persons on each label or envelope using a list of people’s mailing addresses. Anyone or any business that interacts frequently with customers, partners, parents, or other individuals must use the mail merge.
How to create Mail Merge in Digital Documentation
Step 1: Select starting document
Step 2: Select document type
Step 3: Insert address block or Selecting the data source
Step 4: Create salutation
Step 5: Adjust layout
Step 6: Edit document and insert extra fields
Step 7: Personalize documents
Step 8: Save, print or send
What is Data Source
During the mail merge process, data from another document referred to as the data source, Data Source connects to the main document and retrieves the information like names, addresses, and phone numbers can be found in a document, spreadsheet, or database that serves as the data source. What are the different type of Data Source available in Mail Merge
OpenOffice.org allows data sources to be accessed and then linked into OOo documents. For example, a mail merge links an external document containing a list of names and addresses into a letter, with one copy of the letter being generated for each entry.
Different type of File which support to insert data in Mail merge are –
1. Spreadsheet
2. Text File
3. Access or Base Database
4. Address Book
Objective Questions
Question. Which of the following is a type of tab stop in digital documents?
a. Left-aligned
b. Center-aligned
c. Right-aligned
d. All of the above
Answer : D
Question. What happens when you select a Table of Contents in OpenOffice Writer and press F9?
a. The Table of Contents is deleted
b. The Table of Contents is updated
c. The Table of Contents is highlighted
d. None of the above
Answer : B
Question. What is the purpose of a data source in Mail Merge?
a. To create a form letter
b. To connect to the database
c. To create a table of contents
d. To add a hyperlink
Answer : B
Question. What is Mail Merge in Digital Documents?
a. A way to send an email with an attachment
b. A process to combine a document with a database to create personalized copies
c. A feature to create a table of contents
d. A tool to add hyperlinks to a document
Answer : B
Question. What is the shortcut key to copy selected text in a digital document?
a. Ctrl + X
b. Ctrl + C
c. Ctrl + V
d. Ctrl + Z
Answer : B
Question. Which of the following is a type of database used in Mail Merge?
a. Microsoft Excel
b. Microsoft PowerPoint
c. Microsoft Word
d. Microsoft Access
Answer : A
Question. Which of the following is NOT a type of Mail Merge in Microsoft Word?
a. Directory
b. Email
c. Form
d. Presentation
Answer : D
Question. What is the shortcut key to align selected text to the right in Microsoft Word?
a. Ctrl + L
b. Ctrl + E
c. Ctrl + R
d. Ctrl + J
Answer : C
Question. What is the shortcut key to preview the Mail Merge document in Microsoft Word?
a. Alt + P
b. Alt + F
c. Alt + V
d. Alt + M
Answer : A
Question. Which of the following is NOT a type of font style in digital documents?
a. Bold
b. Italic
c. Regular
d. Outline
Answer : D
Question. What is the purpose of a form letter in Mail Merge?
a. To connect to the database
b. To create a table of contents
c. To create a personalized letter
d. To create a hyperlink
Answer : C
Question. Which of the following is a way to insert a Mail Merge field in Microsoft Word?
a. Insert > Field
b. Insert > Picture
c. Insert > Hyperlink
d. Insert > Table
Answer : A
Question. Which of the following is NOT a step in Mail Merge?
a. Create a database
b. Create a form letter
c. Create a table of contents
d. Connect to the database
Answer : C
Question. Which of the following is NOT a step to complete a Mail Merge in Microsoft Word?
a. Edit the merged document
b. Preview the merged document
c. Save the merged document
d. Print the merged document
Answer : C
Question. Which of the following is a benefit of using Mail Merge in Digital Documents?
a. Saves time and effort
b. Increases document size
c. Requires advanced technical knowledge
d. Decreases document quality
Answer : A
Question. What is a Table of Contents?
a. A summary of a book
b. An index of a book
c. A list of the chapters or sections of a book or document
d. A glossary of terms
Answer : C
Question. What is the purpose of the Level setting in a Table of Contents?
a. To change the font size of the headings
b. To specify the heading levels that should be included in the Table of Contents
c. To change the color of the headings
d. None of the above
Answer : B
Question. Which of the following is a Mail Merge field?
a. <<Address>>
b. Address
c. {Address}
d. [Address]
Answer : A
Question. What is the purpose of a Mail Merge wizard in Microsoft Word?
a. To format the merged document
b. To create the data source
c. To guide you through the steps of Mail Merge
d. To preview the merged document
Answer : C
Question. Which of the following is a way to customize a Mail Merge document?
a. Change the font size of the data source
b. Change the color of the merge field
c. Change the page orientation of the merged document
d. Change the filename of the data source
Answer : B
Question. Which of the following formats can a Table of Contents be saved in?
a. PDF
b. DOCX
c. ODT
d. All of the above
Answer : D
Question. In OpenOffice Writer, what is the purpose of the “Outline Level” option under the Entries tab in the table of contents menu?
a. To specify which headings should be included in the table of contents
b. To define the formatting of the entries in the table of contents
c. To group similar entries together in the table of contents
d. To set the indentation level of each entry in the table of contents
Answer : A
Question. Which of the following is an advantage of using a Table of Contents in a document?
a. It makes the document more visually appealing
b. It provides an easy way to navigate the document
c. It helps to shorten the length of the document
d. It provides a summary of the document
Answer : B
Question. How is a Table of Contents created in a digital document?
a. It is automatically generated based on the headings and subheadings in the document.
b. It is manually created by the author of the document.
c. It is automatically generated based on the figures in the document.
d. It is automatically generated based on the footnotes in the document.
Answer : A
Question. Which of the following is NOT a type of template available for digital documents?
a. Business card template
b. Resume template
c. Newsletter template
d. Spreadsheet template
Answer : D
Question. Which of the following is not a recommended practice when creating a table of contents in a digital document?
a. Using automatic numbering for headings
b. Including every heading in the document in the table of contents
c. Updating the table of contents before printing or sharing the document
d. Using a consistent style for all headings in the document
Answer : B
Question. In which tab of the ribbon in OpenOffice Writer can you find the option to insert a Table of Contents?
a. Home
b. Insert
c. Page Layout
d. References
Answer : D
Question. Which of the following is a Mail Merge option in Microsoft Word that allows you to send emails directly from Word?
a. Merge and Split
b. Merge and Protect
c. Merge and Format
d. Merge and Email
Answer : D
Question. Which of the following is a Mail Merge option in Microsoft Word?
a. Merge and Split
b. Merge and Protect
c. Merge and Format
d. Merge and Center
Answer : D
Question. Which of the following is an example of a salutation field in Mail Merge?
a. <<First Name>>
b. <<Last Name>>
c. <<Title>>
d. <<Email Address>>
Answer : C
Question. Which of the following is NOT a type of Mail Merge document?
a. Envelopes
b. Labels
c. Emails
d. Tables
Answer : D
Question. How is a Table of Contents created in OpenOffice Writer?
a. Manually typing the headings and page numbers
b. Automatically generating it using the headings in the document
c. Copy-pasting the headings and page numbers from another document
d. None of the above
Answer : B
Question. Which of the following types of data can be used in a Mail Merge?
a. Text only
b. Numbers only
c. Text and numbers
d. Images only
Answer : C
Question. What is the shortcut key to increase the indent of selected text in OpenOffice Writer?
a. Ctrl + [
b. Ctrl + ]
c. Ctrl + {
d. Ctrl + }
Answer : B
Question. What is the purpose of updating a Table of Contents in a document?
a. To correct any errors in the page numbers
b. To add or remove headings from the document
c. To change the formatting of the Table of Contents
d. All of the above
Answer : D
Question. Which of the following is a Mail Merge option in Microsoft Word that allows you to choose which records to merge?
a. Filter
b. Find
c. Replace
d. Sort
Answer : A
Question. What is the purpose of the “Protect Against Manual Changes” option in the Table of Contents dialog box?
a. To prevent the Table of Contents from being edited manually
b. To prevent the headings in the document from being edited
c. To prevent the page numbers from being edited
d. None of the above
Answer : A
Question. In Microsoft Word, what is the keyboard shortcut to update the table of contents?
a. Ctrl + U
b. Ctrl + Shift + U
c. Ctrl + Shift + F9
d. Ctrl + Alt + F9
Answer : D
Question. What is the purpose of the “From template” option in the table of contents menu in Open Office Writer?
a. To apply a pre-existing style to the table of contents
b. To create a new style for the table of contents
c. To import a table of contents from another document
d. To customize the structure of the table of contents
Answer : A
Question. What is the purpose of the “Update page numbers only” option in the table of contents menu in Microsoft Word?
a. To update the page numbers in the table of contents without changing the formatting
b. To update the formatting of the table of contents without changing the page numbers
c. To add or remove entries from the table of contents without affecting the page numbers
d. To create a new table of contents with updated page numbers and formatting
Answer : A
Question. What is a template in digital document?
a. A pre-designed document with placeholders for text, graphics, and other elements
b. A type of font used in digital documents
c. A tool to organize a digital document
d. A way to convert digital documents into other file formats
Answer : A
Question. How can you remove a Table of Contents from a document in OpenOffice Writer?
a. By selecting the Table of Contents and pressing the Delete key
b. By selecting the Table of Contents and choosing the Delete option from the context menu
c. By deselecting the Table of Contents option in the Table of Contents dialog box
d. None of the above
Answer : A
Question. Which option in the table of contents menu in OpenOffice Writer allows you to customize the appearance of the table of contents?
a. Structure
b. Entries
c. Styles
d. Preview
Answer : C
Question. Which of the following is an example of a digital document template?
a. A blank sheet of paper
b. A resume with pre-defined sections for work experience and education
c. A list of bullet points
d. A spreadsheet with formulas for calculations
Answer : B
Question. In Microsoft Word, which option in the table of contents menu allows you to change the font and size of the table of contents entries?
a. Show Levels
b. Formats
c. Styles
d. Options
Answer : B
Question. Which of the following is a way to edit a Mail Merge document after it has been merged?
a. Edit the original data source
b. Edit the merged document directly
c. Edit the Mail Merge fields
d. Edit the font of the merged document
Answer : B
Question. Which of the following is a benefit of using a table of contents in a digital document?
a. It makes the document look more visually appealing
b. It helps the reader navigate the document more easily
c. It saves paper when printing the document
d. It increases the word count of the document
Answer : B
Question. How can you customize the formatting of a Table of Contents in OpenOffice Writer?
a. By using the Table of Contents dialog box
b. By using the Page Layout tab of the ribbon
c. By manually formatting each entry in the Table of Contents
d. None of the above
Answer : A
Question. In OpenOffice Writer, which option in the table of contents menu allows you to add or remove hyperlinks from the table of contents entries?
a. Entries
b. Structure
c. Styles
d. Preview
Answer : A
Question. What is the purpose of adding hyperlinks to a Table of Contents in a digital document?
a. To make the document more visually appealing.
b. To allow the reader to navigate directly to a specific section of the document.
c. To increase the length of the document.
d. To improve the grammar and spelling in the document.
Answer : B
Question. Which of the following software programs offers a variety of templates for digital documents?
a. Adobe Photoshop
b. Microsoft Excel
c. Google Docs
d. All of the above
Answer : C
Question. Which of the following is a benefit of using a Table of Contents in a digital document?
a. It makes the document more visually appealing.
b. It allows the reader to quickly locate specific sections of the document.
c. It increases the length of the document.
d. It improves the grammar and spelling in the document.
Answer : B
Question. Which of the following is NOT a step in using a template for a digital document?
a. Customizing the template with personal information and details
b. Saving the customized template as a new document
c. Printing the template for distribution
d. Uploading the customized template to a cloud storage service
Answer : C
Question. Which of the following is a common feature of a Table of Contents in a digital document?
a. Each section is numbered and corresponds to a page number.
b. Each section is highlighted with a different color.
c. Each section contains a footnote.
d. Each section is accompanied by a photograph.
Answer : A
Question. What is the difference between a Table of Contents and an Index in a digital document?
a. A Table of Contents is used to list all the tables in the document, while an Index is used to list all the headings and subheadings in the document.
b. A Table of Contents is used to list all the figures in the document, while an Index is used to list all the footnotes in the document.
c. A Table of Contents is used to list all the headings and subheadings in the document, while an Index is used to list all the tables and figures in the document.
d. A Table of Contents and an Index are the same thing.
Answer : C
Question. What is the purpose of a Table of Contents in a digital document?
a. To provide a list of all the tables in the document.
b. To provide a list of all the figures in the document.
c. To provide a list of all the headings and subheadings in the document.
d. To provide a list of all the footnotes in the document.
Answer : C
Question. Which of the following is NOT an advantage of using templates in digital documents?
a. Saves time and effort in document creation
b. Ensures consistency and branding across documents
c. Helps to organize and structure information effectively
d. Limits creativity and flexibility in document design
Answer : D
Question. Which of the following is a disadvantage of using a Table of Contents in a digital document?
a. It can make the document more difficult to navigate.
b. It can make the document more visually unappealing.
c. It can decrease the length of the document.
d. It can decrease the readability of the document.
Answer : A
Question. Which of the following is true about a Table of Contents in a digital document?
a. It is used to list all the tables in the document.
b. It is used to list all the figures in the document.
c. It is used to list all the headings and subheadings in the document.
d. It is used to list all the footnotes in the document.
Answer : C
Question. Templates in digital documents are typically created by:
a. Professional designers
b. Software developers
c. End-users
d. None of the above
Answer : A
| CBSE Class 10 Computer Science Chapter 1 Entrepreneurial Skills-II Notes |
| CBSE Class 10 Computer Science Chapter 2 Green Skills-II Notes |
| CBSE Class 10 Computer Science Chapter 3 Database Management System Notes |
| CBSE Class 10 Computer Science Chapter 4 Web Applications and Security Notes |
| CBSE Class 10 Computer Science Digital Documentation Advanced |
| CBSE Class 10 Computer Science Electronic Spreadsheet Advanced |
| CBSE Class 10 Computer Science ICT Skills II |
| CBSE Class 10 Computer Science Self Management Skills II |
More Study Material
CBSE Class 10 Computer Science Digital Documentation Advanced Notes
We hope you liked the above notes for topic Digital Documentation Advanced which has been designed as per the latest syllabus for Class 10 Computer Science released by CBSE. Students of Class 10 should download and practice the above notes for Class 10 Computer Science regularly. All revision notes have been designed for Computer Science by referring to the most important topics which the students should learn to get better marks in examinations. Studiestoday is the best website for Class 10 students to download all latest study material.
Notes for Computer Science CBSE Class 10 Digital Documentation Advanced
Our team of expert teachers have referred to the NCERT book for Class 10 Computer Science to design the Computer Science Class 10 notes. If you read the concepts and revision notes for one chapter daily, students will get higher marks in Class 10 exams this year. Daily revision of Computer Science course notes and related study material will help you to have a better understanding of all concepts and also clear all your doubts. You can download all Revision notes for Class 10 Computer Science also from www.studiestoday.com absolutely free of cost in Pdf format. After reading the notes which have been developed as per the latest books also refer to the NCERT solutions for Class 10 Computer Science provided by our teachers
Digital Documentation Advanced Notes for Computer Science CBSE Class 10
All revision class notes given above for Class 10 Computer Science have been developed as per the latest curriculum and books issued for the current academic year. The students of Class 10 can rest assured that the best teachers have designed the notes of Computer Science so that you are able to revise the entire syllabus if you download and read them carefully. We have also provided a lot of MCQ questions for Class 10 Computer Science in the notes so that you can learn the concepts and also solve questions relating to the topics. All study material for Class 10 Computer Science students have been given on studiestoday.
Digital Documentation Advanced CBSE Class 10 Computer Science Notes
Regular notes reading helps to build a more comprehensive understanding of Digital Documentation Advanced concepts. notes play a crucial role in understanding Digital Documentation Advanced in CBSE Class 10. Students can download all the notes, worksheets, assignments, and practice papers of the same chapter in Class 10 Computer Science in Pdf format. You can print them or read them online on your computer or mobile.
Notes for CBSE Computer Science Class 10 Digital Documentation Advanced
CBSE Class 10 Computer Science latest books have been used for writing the above notes. If you have exams then you should revise all concepts relating to Digital Documentation Advanced by taking out a print and keeping them with you. We have also provided a lot of Worksheets for Class 10 Computer Science which you can use to further make yourself stronger in Computer Science
You can download notes for Class 10 Computer Science Digital Documentation Advanced for latest academic session from StudiesToday.com
Yes, you can click on the link above and download notes PDFs for Class 10 Computer Science Digital Documentation Advanced which you can use for daily revision
Yes, the notes issued for Class 10 Computer Science Digital Documentation Advanced have been made available here for latest CBSE session
You can easily access the link above and download the Class 10 Notes for Computer Science Digital Documentation Advanced for each topic in Pdf
There is no charge for the notes for CBSE Class 10 Computer Science Digital Documentation Advanced, you can download everything free of charge
www.studiestoday.com is the best website from which you can download latest notes for Digital Documentation Advanced Computer Science Class 10
Come to StudiesToday.com to get best quality topic wise notes for Class 10 Computer Science Digital Documentation Advanced
We have provided all notes for each topic of Class 10 Computer Science Digital Documentation Advanced as per latest CBSE syllabus