
Download CBSE Class 8 Computer Science Photoshop Review Notes in PDF format. All Revision notes for Class 8 Computer Science have been designed as per the latest syllabus and updated chapters given in your textbook for Computer Science in Class 8. Our teachers have designed these concept notes for the benefit of Class 8 students. You should use these chapter wise notes for revision on daily basis. These study notes can also be used for learning each chapter and its important and difficult topics or revision just before your exams to help you get better scores in upcoming examinations, You can also use Printable notes for Class 8 Computer Science for faster revision of difficult topics and get higher rank. After reading these notes also refer to MCQ questions for Class 8 Computer Science given on studiestoday
Revision Notes for Class 8 Computer Science Photoshop Review
Class 8 Computer Science students should refer to the following concepts and notes for Photoshop Review in Class 8. These exam notes for Class 8 Computer Science will be very useful for upcoming class tests and examinations and help you to score good marks
Photoshop Review Notes Class 8 Computer Science
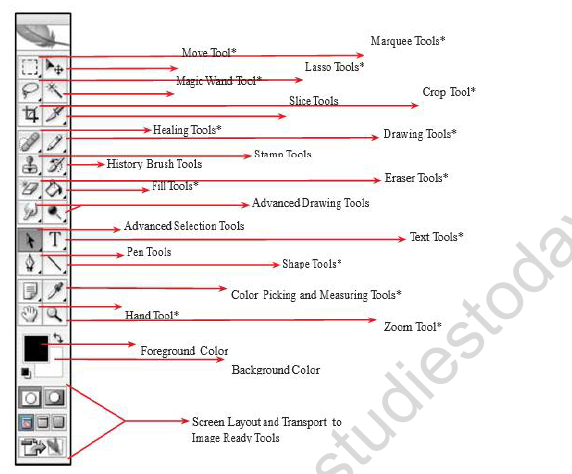

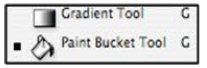
Fill Tools: The Fill tools fill color into areas of the document.
• The Paint Bucket tool fills in areas of similar color with the foreground color.
• The Gradient Tool creates a smooth straight-line change from the foreground color to the background color.
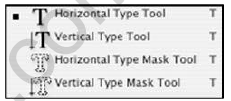
Text Tools: The Type tools add text to a document.
• The type tools create type on top of an image.
• The type mask tools make a selection of the document in the shape of type.
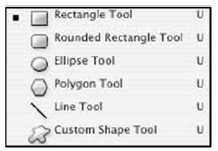
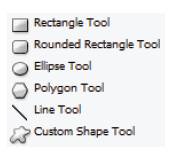
Shape Tools: The Shape tools draw shapes and lines in a normal layer or a shape layer.
• The Shape tools will create a solid color shape of their type.
• The Line tool will create a solid color line.
• The Custom Shape tool makes customized shapes selected from a custom shape list.
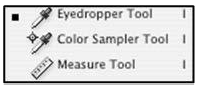
Color Picking and Measuring Tools: The Color Picking and Measuring tools do not actually change the document in any way.
• The Eyedropper tool changes the foreground color to the color that is clicked on.
• The Color Sampler tool is an advanced tool.
• The Measure tool measures the distance, location, and angle between to points in the document
Hand Tool: The Hand tool moves an image within its window.
Zoom Tool: The Zoom tool magnifies and reduces the view of an image.
SUMMARY
1. Photoshop is considered one of the leaders in photo editing software.
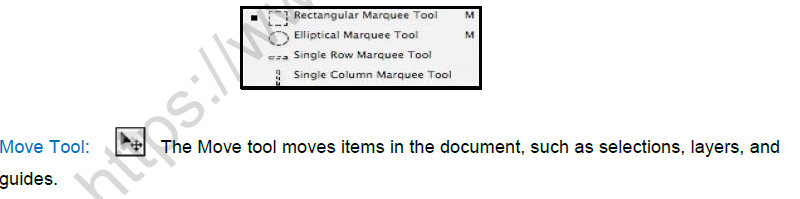
2. The Marquee tool selects a section of the document based on the shape of the chosen tool.
3. The Move tool moves items in the document, such as selections, layers, and guides.
4. The Magic Wand tool selects areas of similar colors.
5. The Color Picking and Measuring tools do not actually change the document in any way.
6. The Hand tool moves an image within its window.
7. The Zoom tool magnifies and reduces the view of an image.


M curves
The M curve is a little trickier because it involves a new tool: The Convert Point tool. The convert point tool is found under the pen tool in the tool box
1. From your starting point, drag upwards. You are creating the direction handle.
2. Move to the right and parallel, drag downward. You are creating an inverted U curve right now.
3. Now the tricky part: Hold the Alt (Option) Key and drag upward. First you define a direction with a direction handle (The initial drag of the mouse). The next click actually draws the curve based on the direction of the first drag and the second. If you want a sharp curve (called a cusp), you need to first change the direction of the handle without affecting the previously drawn curve. The Convert point tool, is such the tool for this task. The Alt (Option) Key is a quick way to temporarily choose the Convert Point tool.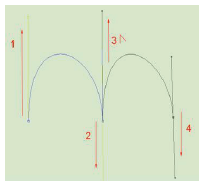
1. Position your pointer to the right of the second point and drag down You’ve just made an M curve.
Closed paths
A closed path. X marks the start/end point. To help in creating your curves, you may want to show the grid under the View>Show menu.
The paths described so far are open paths—that is, they’re not fully enclosed shapes. They’re just lines, and therefore you can’t use them to select areas of your image, or fill them up with solid colors A closed path, on the other hand, can be filled with color, texture or patterns. It can be turned into a selection to use on an image.
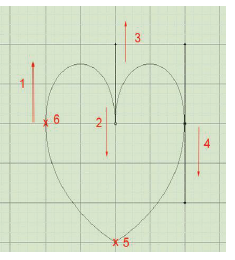
1. Repeat the steps for the M curve.
2. Click to add a point beneath the other three points.In the middle, the shape of the heart begins forming.
3. Finally, point to the first point you created, without clicking.
• A small circle appears by the pointer. It tells you that your mouse is hovering over the initial starting point. Click on the circle to close the path and form a closed loop.
4. Click the point to close the path and complete your heart.
Combining vector paths
If you’re using the Pen tool (P), and you’ve created multiple paths within your document, these paths are totally separate, and are moved independently of one another. However, if you want these paths to move as one unit—combine them. Just switch to the Path Selection tool (Shift-A until it comes up), then go up to the Options Bar and click on the Combine button. Now when you move one path, all the combined paths move right along with it.
Converting shapes to selections
Convert paths to selection borders
Paths provide smooth outlines that you can convert into precise selection borders. You can also convert selection borders into paths, using the Direct Selection tool for fine-tuning.You can define any closed path as a selection border. A closed path can be added to,subtracted from, or combined with the current selection.
Convert a path to a selection border using the current settings
1. Select the path in the Paths panel.
2. To convert the path, do one of the following:
• Click the Load Path as a Selection button at the bottom of the Paths panel.
• Ctrl-click (Windows) or Command-click (Mac OS) the path thumbnail in the Paths panel.
Convert a path to a selection border and specify settings
1. Select the path in the Paths panel.
2. Do one of the following:
• Alt-click (Windows) or Option-click (Mac OS) the Load Path As A Selection button at the bottom of the Paths panel.
• Alt-drag (Windows) or Option-drag (Mac OS) the path to the Load Path As A Selection button.
• Choose Make Selection from the Paths panel menu.
3. In the Make Selection dialog box, select a Rendering option:
Feather Radius
Defines how far inside and outside the selection border the feather edge extends. Enter a value in pixels.
Anti-aliased
Creates a finer transition between the pixels in the selection and the surrounding pixels.Make sure the Feather Radius is set to 0.
4. Select an Operation option:
New Selection
Selects only the area defined by the path.
Add To Selection
Adds the area defined by the path to the original selection.
Subtract From Selection
Removes the area defined by the path from the current selection.
Intersect With Selection
Selects the area common to both the path and the original selection. If the path and selection
do not overlap, nothing is selected.
5. Click OK.
Manipulating vector paths
You can reorder saved paths that are not Shape, Type, or Vector Mask paths in the Paths panel.
• In the Paths panel, drag the path to the position you want. In Photoshop CC, you can select and drag more than one path simultaneously.
Duplicate paths
1. In the Paths panel, select the path you want to duplicate. In Photoshop CC, you can select more than one path.
2. Do any of the following:
• Alt-drag (Windows) or Option-drag the paths.
• Choose Duplicate Path from the panel menu.
Adjust path segments
You can edit a path segment at any time, but editing existing segments is slightly different from drawing them. Keep the following tips in mind when editing segments:
• If an anchor point connects two segments, moving that anchor point always changes both segments.
• When drawing with the Pen tool, you can temporarily activate the Direct Selection tool so that you can adjust segments you have already drawn; press Ctrl (Windows) or Command
(Mac OS) while drawing.
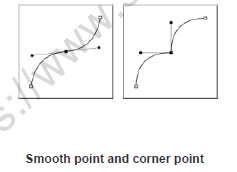
• When you initially draw a smooth point with the Pen tool, dragging the direction point changes the length of the direction line on both sides of the point. However, when you edit an existing smooth point with the Direct Selection tool, you change the length of the direction line only on the side you are dragging.
Move straight segments
1. With the Direct Selection tool , select the segment you want to adjust.
2. Drag the segment to its new position.
Adjust the length or angle of straight segments
1. With the Direct Selection tool, select an anchor point on the segment you want to adjust.
2. Drag the anchor point to the desired position. Shift-drag to constrain the adjustment to multiples of 45°.
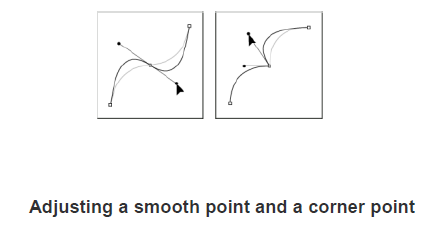
Adjust the position or shape of curved segments
1. With the Direct Selection tool, select a curved segment, or an anchor point on either end of the curved segment. Direction lines appear, if any are present.
(Some curved segments use just one direction line.)
2. Do any of the following:
• To adjust the position of the segment, drag the segment. Shift-drag to constrain the adjustment to multiples of 45°.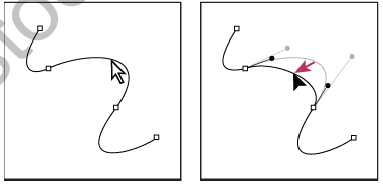
Click to select the curve segment. Then drag to adjust.
• To adjust the shape of the segment on either side of a selected anchor point, drag the anchor point or the direction point. Shift-drag to constrain movement to multiples of 45°.
Drag the anchor point, or drag the direction point.
Type in Photoshop
Type in Photoshop consists of mathematically defined shapes that describe the letters, numbers, and symbols of a typeface. When you add type to an image in Photoshop, the characters are composed of pixels and have the same resolution as the image file. However, Photoshop preserves the vector-based type outlines and uses them when you scale or resize type, save a PDF or EPS file, or print the image to a PostScript printer.
Typographic design
1. Choosing your image and preparing the canvas
Start by choosing a portrait image you’d like to turn into a Typography Poster. It’s best to choose a large image so you can see all the features of the face clearly.
2. Adding in Color Range Shadows and Mid Tones
To select the appropraite areas on the face you’ll be using the Color Range Tool. This will select all the different tones on the face. Each time a Color Range is selected you’ll copy and paste it onto a new layer. You’ll be removing the original image from view to have a transparent background.
3. Converting to Black and White and Merging the 2 Color Range Layers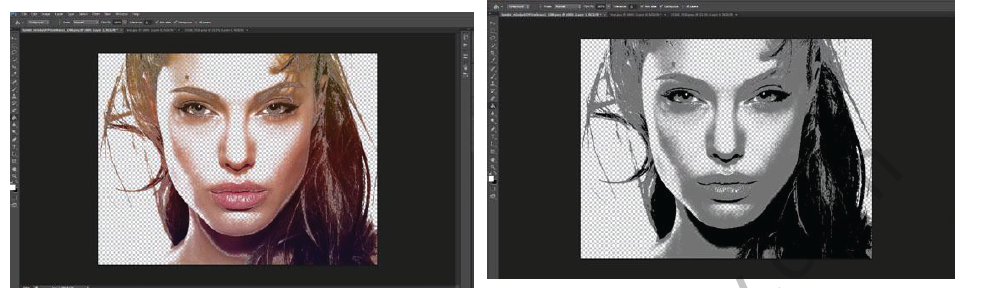
You’ll then to converting the 2 Tones into Black and White and merging the two layers together.
4. Create a new Canvas and add Text
Next you create a new canvas with the same size as the portrait image. Write out the text you’d like in the Typography Portrait; a poem or quote might add a nice touch rather than meaningless words.
5. Adding in yout Text
The text is then turned into a Brush and clicked onto the portrait canvas into a new layer using varient brushes sizes. A mask layer it then placed on the text layer. Go to your portrait layer and copy the image, the mask layer is click where you paste in the image. The portrait image on the mask layer is then inverted. You then click back onto the original text layer and remove the original portrait layer from view to see the new typographic portrait.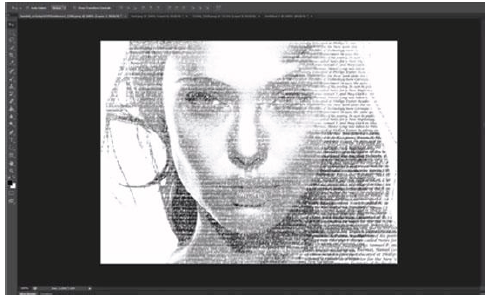
6. Gradient and Final Touches
A Gradient Option is added using Blending Options and a soft brush is selected and brushed on certain areas of the face using the color black and an opacity of 33% to enhance certain areas.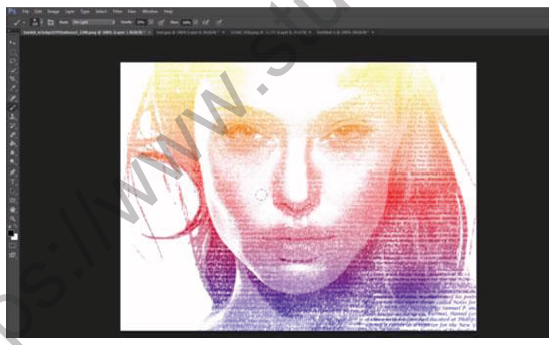
Creating a clipping mask from type
A clipping mask is an object or a group of objects whose shape masks other artwork so that only areas that lie within the shape of the masking object are visible. In effect, you are clipping the artwork to conform to the shape of the object (or mask). In Photoshop, you can create a clipping mask from
shapes or letters.
Creating a design element from type
To be demonstrated in practical class by teacher
Using interactive formatting controls
The Character palette in Photoshop contains many options to help you set beautiful type, but not all of the choices and controls are obvious—as in the trick of scrubbing the Tracking icon to choose a tracking value.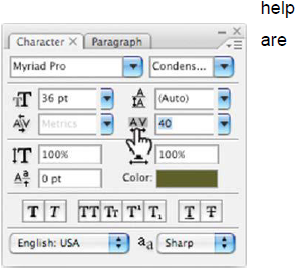
• Select some type in the image window, click the font displayed in the Font Family pop-up menu, and press the up and down arrow keys to cycle through the available fonts and watch
them preview interactively in the image window.
Wrapping font type
Warping lets you distort type to conform to a variety of shapes, such as an arc or a wave. You can change a layer's warp style at any time to change the overall shape of the warp. Warping options give you precise control over the orientation and perspective of the warp effect.![]()
Designing a paragraph of type
In Photoshop, you will often use point type - a few discrete words or lines – which are added by clicking once with the Type tool and then adding some text. Often, however, a design may call for full paragraphs of text. You can design complete paragraphs of type in Photoshop and you don't have to switch to page-layout program to get paragraph type control. In this short tutorial I'll show you how to do it.
Step 1
Open or create an image that you want to add a paragraph of text to. I'm using this picture of a couple of pears.
Step 2
Select the Horizontal Type tool (), and in the Character palette, choose a typeface. I'm using Century,I've set the Size to 12 points, Leading to Auto, Tracking to 0, and text Colour to white.
Step 3
Click the Paragraph tab to bring the Paragraph palette forward, and click the Justify Last Left button.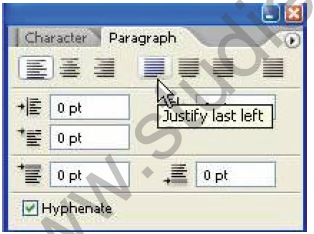
Step 4
Select the Horizontal Type Tool from the toolbox and instead of just clicking once on the document window, click and drag out a rectangular marquee.
This creates a text box into which your text will flow.
You will notice a small flashing cursor inside the text box. Start typing in your text, or if you have copied some text from another document or web page, press Ctrl+V (windows) to paste the text that you copied into the text box. Your text will now flow neatly from one side of the text box to the other, because you selected Justified from the paragraph palette.

Step 5
Once your text is in the text box, you can use the Move tool to drag the text to wherever you want on the image.
Preparing file for print
• Always transform your images in their native application. Size, crop, rotate, shear, and reflect art in Photoshop.
• Ensure that images can first print from Photoshop. Do this before importing the images into an illustration or page layout program.
• When saving Photoshop images for print purposes, stick to TIFF, EPS, native PSD, or PDF file formats.
• Make sure that you use the proper color mode. For example, use CMYK for color separations for offset printing and RGB for photographic prints.
• Create vector shapes and paths efficiently. Use the fewest number of anchor points possible to create the path and delete any unnecessary or stray points.
• Make sure that all scanning is at the appropriate resolution.
• If your image is to bleed (extend to the edge of the printed page), take that into account when creating your image. Note that you need to allow for 1/8 to 1/4 of an inch on any side that will bleed to allow for slippages when the paper is cut.
• When using spot colors, always specify colors from a Pantone color swatch chart and then select the color, whether process or spot, in Photoshop.
• Print and provide laser or inkjet prints of your file, both separations (if warranted), and a composite print.
• Provide all fonts used in your file. Provide both screen and PostScript printer fonts, if applicable.
• Choose File→Save As for your final save to squeeze down to the smallest file size.
• Organize your files into folders.
Preparing file for web output
What Makes a Graphic “Web-Ready” image in Photoshop
1. Resolution is 72 dpi
2. Color mode is RGB
3. Generally reduced in file size for faster
4. Format is mainly jpeg, bmp or gif
This process utilizes five steps:
1. Downsize the image.
2. Sharpen the image.
3. Save a copy of the image with the layers.
4. Convert the color space/flatten the image.
5. Convert to eight-bit image.
6. Save the JPEG image.
File compression
1. Open an image to experiment with. If you copy an image from the clipboard, choose File -->
New from Clipboard.
2. Choose File --> Save As (Ctrl+Shift+S) to save the original image.
3. Choose File --> Save For Web (Alt+Shift+Ctrl+S) or choose the Save For Web icon in the Shortcuts bar.
4. Inspect the settings contained in the Save For Web dialog box.
5. The JPEG quality setting is set to Maximum/100 by default
6. Adjust the quality settings — High (60%), Medium (30%), and Low (10%) — in the Settings drop-down list and then fine-tune the numeric settings in the Quality text box.
7. Type a number, such as 40 or 50 percent, to make additional changes to the numeric setting.
8. Photoshop and Photoshop Elements use lower compression values to indicate more compression and a smaller file size (100 = least compression, 1 = most);
9. Click OK when you're ready to save your image.
SUMMARY
1. Vector shapes are lines and curves you draw using the shape or pen tools.
2. Vector shapes are resolution-independent—they maintain crisp edges when resized, printed to
a PostScript printer, saved in a PDF file, or mported into a vector-based graphics application.
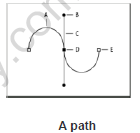
3. A path consists of one or more straight or curved segments. Anchor points mark the end points of the path segments.
4. Type in Photoshop consists of mathematically defined shapes that describe the letters, numbers, and symbols of a typeface.
5. A clipping mask is an object or a group of objects whose shape masks other artwork so that only areas that lie within the shape of the masking object are visible.
6. Warping lets you distort type to conform to a variety of shapes, such as an arc or a wave. You can change a layer's warp style at any time to change the overall shape of the warp.


Editing a quick mask
The advantage of editing your selection as a mask is that you can use almost any tool or filter to modify the mask. (You can even use selection tools.)
In Quick Mask mode, you do all of your editing in the image window. Photoshop automatically defaults to Grayscale mode. The foreground color defaults to black, and the background color defaults to white. When using a painting or editing tool in Quick Mask mode, keep these principles in mind:
• Painting with white erases the mask (the red overlay) and increases the selected area.
• Painting with black adds to the mask (the red overlay) and decreases the selected area.
• Painting with gray areas lighter areas are more subject to change than darker areas.
Saving a selection as a mask
Quick masks are temporary. They disappear as soon as you deselect. However, you can save a selection as an alpha-channel mask so that your time-consuming work won't be lost and you can reuse the selection in this work session or a later one. You can even use alpha channels in other
Photoshop image files.
Masks are saved in channels, which can be thought of as storage areas for color and selection information in an image.
To avoid confusing channels and layers, think of channels as containing an image's color and selection information; think of layers as containing painting and effects. You can edit a mask once it has been saved in a channel by painting on it in a channel using black,white, and shades of gray. Black areas completely protect an image from changes. White areas are completely subject to change. In gray areas, lighter areas are more subject to change than darker areas.
Note If you save and close a file while in Quick Mask mode, the quick mask will show in its own channel the next time you open the file. If, however, you save and close your file while in Standard mode, the quick mask will be gone the next time you open your file.
Viewing channels
The first step is accessing channels by choosing Window→Channels. The Channels panel appears Selecting a channel in the Channels panel automatically makes it appear in the image window. To select a channel, click the channel thumbnail or name in the panel. To select more than one channel, Shift-click. To show or hide a channel, click in the eye column in the far left of the panel. You can also drag through the column to hide or show the channels quickly.
Adjusting individual channels
You can select one or more channels in the Channels panel. The names of all selected,or active, channels are highlighted Selecting multiple channels
A. Not visible or editable
B. Visible but not selected for editing
C. Selected for viewing and editing
D. Selected for editing but not viewing
• To select a channel, click the channel name. Shift-click to select (or deselect) multiple channels.
• To edit a channel, select it and then use a painting or editing tool to paint in the image. You can paint on only one channel at a time. Paint with white to add the selected channel’s color at 100% intensity. Paint with a value of gray to add the channel’s color at a lower intensity. Paint with black to fully remove the channel’s color.
Loading a mask as a selection
The channel mask remains stored in the Channels palette even after you've loaded it as a selection.This means that you can reuse the mask whenever you want. To apply a saved mask to an image or selection choose Select > Load Selection and then select the mask (alpha channel) you want to use.
Loading a selection into an image using shortcuts
You can reuse a previously saved selection by loading it into an image. To load a saved selection using shortcuts, do one of the following in the Channels palette:
• Select the alpha channel, click the Load Channel as Selection button at the bottom of the palette, and then click the composite color channel near the top of the palette.
• Drag the channel that contains the selection you want to load onto the Load Channel as Selection button.
• Ctrl-click (Windows) or Command-click (Mac OS) the channel containing the selection you want to load.
• To add the mask to an existing selection, press Ctrl-Shift (Windows) or Command-Shift (Mac OS), and click the channel.
• To subtract the mask from an existing selection, press Ctrl-Alt (Windows) or Command-Option (Mac OS), and click the channel.
• To load the intersection of the saved selection and an existing selection, press Ctrl-Alt-Shift (Windows) or Command-Option- Shift (Mac OS), and select the channel.
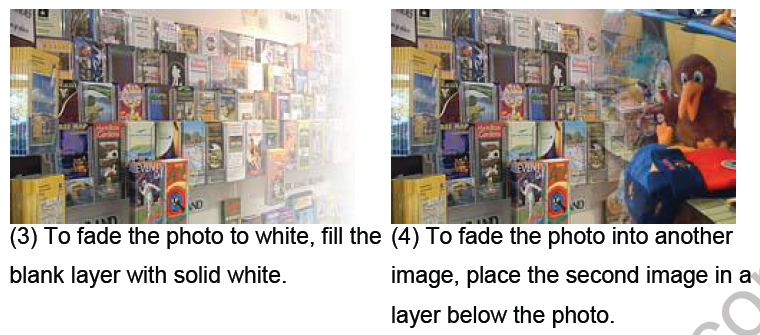
Applying effects using a gradient mask
How to Create a Transparent Gradient in Photoshop?
1. Create a Photoshop file with two layers - one blank and the other containing the image to be made transparent. Select the image's layer.
2. Click the Add layer mask icon at the bottom of the layer’s palette.
3. A layer mask is created in the image layer.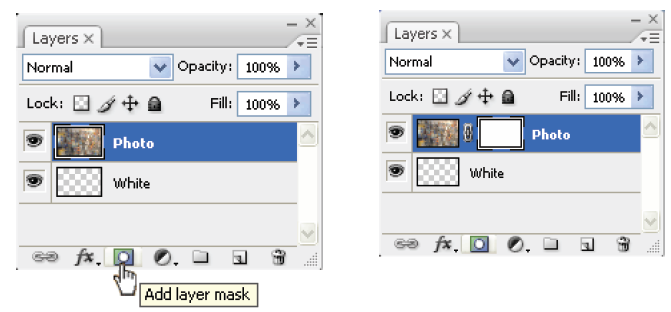
4. Select the gradient tool and apply a black/white gradient to the image layer.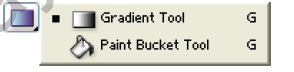
In the example below, a gradient is applied to the photo from right to left.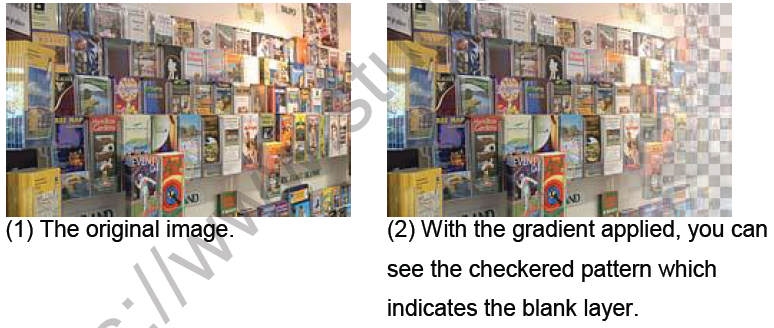
Resizing the canvass
The canvas size is the full editable area of an image. The Canvas Size command lets you increase or decrease an image’s canvas size. Increasing the canvas size adds space around an existing image.
Decreasing an image’s canvas size crops into the image. If you increase the canvas size of an image with a transparent background, the added canvas is transparent. If the image doesn’t have a transparent background, there are several options for determining the color of the added canvas.
1. Choose Image > Canvas Size.
2. Do one of the following:
• Enter the dimensions for the canvas in the Width and Height boxes. Choose the units of measurement you want from the pop-up menus next to the Width and Height boxes.
• Select Relative, and enter the amount you want to add or subtract from the image’s current canvas size. Enter a positive number to add to the canvas, and enter a negative number to subtract from the canvas.
3. For Anchor, click a square to indicate where to position the existing image on the new canvas.
4. Choose an option from the Canvas Extension Color menu:
• Foreground to fill the new canvas with the current foreground color
• Background to fill the new canvas with the current background color
• White, Black, or Gray to fill the new canvas with that color
• Other to select a new canvas color using the Color Picker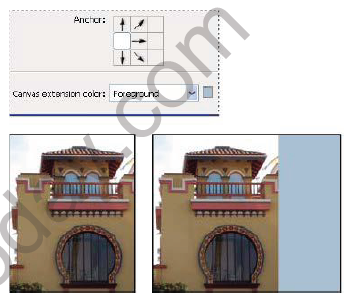
5. Click OK
Moving layers between documents
You can copy any layer, including the Background layer, from one image to another. Keep in mind that the resolution of the destination image determines how large the printed copy of the layer can be. Also, if the pixel dimensions of the two images are not the same, the copied layer may appear smaller or larger than you’d expect.
1. Open the two images you want to use.
2. In the Layers panel of the source image, select the layer that you want to copy.
3. Do one of the following:
• Choose Select > All to select all of the pixels in the layer, and choose Edit > Copy.
Then make the destination image active, and choose Edit > Paste.
• Drag the layer’s name from the Layers panel of the source image into the destination image.
• Use the Move tool (Select section of the toolbox), to drag the layer from the source image to the destination image.
Duplicate one or more layers in another image
You can take any layer, including the Background layer, from one image and duplicate it in another. Keep in mind that the pixel dimensions of the destination image determine how large the printed copy of the duplicated layer can be. Also, if the pixel dimensions of the two images are not the same, the duplicated layer may appear smaller or larger than you’d expect.
1. Open the source image. If you plan to copy a layer to an existing image rather than a new one, open the destination image as well.
2. In the source document’s Layers panel, select the name of the layer or layers you want to duplicate. To select more than one layer, hold down the Ctrl key (Command key in Mac OS) and click each player’s name.
3. Choose Layer > Duplicate Layer, or choose Duplicate Layer from the More menu in the Layers panel.
4. Type a name for the duplicate layer in the Duplicate Layer dialog box, and choose a destination document for the layer, and then click OK:
• To duplicate the layer in an existing image,choose a filename from the Document pop-up menu.
• To create a new document for the layer, choose New from the Document menu, and enter a name for the new file. An image created by duplicating a layer has no background.
Colorizing with an adjustment layers
The Color Range feature, which is useful for creating a selection area based on sampled colors in an image, can also be used to create an adjustment layer mask.
1. In the Layers panel, select the layer to which you want to apply the adjustment layer.
2. Choose Layer > New Adjustment Layer, and choose an adjustment type.
3. In the Masks section of the Properties panel, click Color Range.
4. In the Color Range dialog box, choose Sampled Colors from the
5. Select menu.
6. Select Localized Color Clusters to build a mask based on different color ranges in the image.
7. Set the display option to Selection, and Selection Preview to None.
8. Click a color area in the image.As you click on image areas, you can preview the mask in the Color Range dialog box. White areas are unmasked pixels, black areas masked, and gray areas partially masked.
9. Use the Fuzziness slider to increase or decrease the range of colors around your sample colors that are included in the masked area. Use the Range slider to control how far or near a color must be from the sample points to be included in the mask. After adjusting the mask, click OK to close the Color Range dialog box.
10.Modify the adjustment as needed in the Properties panel.
Grouping and clipping layers
Grouping layers helps organize your projects and keeps your Layers panel uncluttered. By linking layers, you establish a relationship between them, even if they aren't next to each other in your layer order.
Group and ungroup layers
1. Select multiple layers in the Layers panel.
2. Do one of the following:
• Choose Layer > Group Layers.
• Alt-drag (Windows) or Option-drag (Mac OS) layers to the folder icon at the bottom of the Layers panel to group the layers.
3. To Ungroup the layers, select the group and choose Layer > Ungroup Layers.
Add layers to a group
• Do one of the following:
• Select the group in the Layers panel and click the Create a New Layer button .
• Drag a layer to the group folder.
• Drag a group folder into another group folder. The group and all of its layers move.
• Drag an existing group to the New Group button .
CLIPPING MASKS
A clipping mask is a group of layers to which a mask is applied.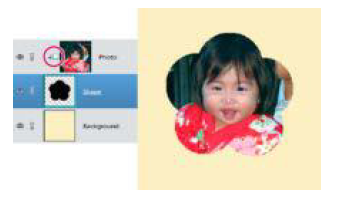
The bottommost layer, or base layer, defines the visible boundaries of the entire group. For example, suppose you have a shape in the base layer, a photograph in the layer above it, and text in the topmost layer. If the photograph and text appear only through the shape outline in the base layer, they also take on the opacity of the base layer.
You can group only successive layers. The name of the base layer in the group is underlined, and the thumbnails for the overlying layers are indented. Additionally, the overlying layers display the clipping mask icon.
The shape in the bottom layer of the clipping mask determines what area of the photo layer above shows through.
Create a clipping mask
1. Do one of the following:
• Hold down Alt (Option in Mac OS), position the pointer over the line dividing two layers in the Layers panel (the pointer changes to two overlapping circles), and then click.
• In the Layers panel, select the top layer of a pair of layers you want to group, and choose Layer > Create Clipping Mask.
2. When making a clipping mask from an existing layer and one you are about to create, first select the existing layer in the Layers panel.Then choose New Layer from the Layer menu or the Layers panel More menu. In the NewLayer dialog box, select Use Previous Layer to Create Clipping Mask, and click OK.
Applying a mask from a saved selection
To be demonstrated in practical class by teacher.
Using type as a mask
Using the Type Mask tool in Photoshop Elements epitomizes the combination of type and image. The Type Mask tool doesn’t create a new layer. Instead, it creates a selection on the active layer. This is the tool of choice for filling text with an image or cutting text out of an image so that the background shows through.
shows through.
Here are the steps to create a type mask:
1. In Edit Full mode, open the image of your choice.
2. Convert your background into a layer by double-clicking the word Background on the Layers panel; and then click OK.
3. Choose the Horizontal Type Mask tool from the Tools panel.
4. Specify your type options (such as font family, style, and size) on
5. Click the image and type your desired text. When you’re done, click the Commit button on the Options bar.A selection border in the shape of your type appears on your image.
6. Choose Select→Inverse, which deselects your letter selections and selects everything else.
7. Press the Backspace (Delete on a Mac) key to delete everything outside your selection border. Your type is now filled with your image.
8. Choose Select→Deselect.
9. Experiment with applying layer styles to your type.
SUMMARY
1. The Drawing and Type tools create and alter vector objects. Drawing tools work on vector paths, which are vector-based outlines you can turn into selections.
2. The Horizontal Type tool is the default Type tool. Click and drag to make a text box.
3. Rectangle tool creates a rectangle shape (or square if constraining proportions by holding shift).
4. Photoshop masks isolate and protect parts of an image, just as masking tape protects window panes or trim from paint when a house is painted.
5. Quick Mask mode lets you edit any selection as a mask without using the Channels palette and while viewing your image.
6. Grouping layers helps organize your projects and keeps your Layers panel uncluttered.
7. A clipping mask is a group of layers to which a mask is applied. The bottommost layer, or base layer, defines the visible boundaries of the entire group.
8. Using the Type Mask tool in Photoshop Elements epitomizes the combination of type and image.
9. Path Selection tool use to move entire paths around the canvas as a single object. The path or shape layer retains its shape.
10.Direct Selection tool use to select and move individual points and Bezier handles of a path or shape layer.
11.Vertical type tool is similar to the Horizontal Type tool except that the type stacks vertically, and the text direction goes from right to left for Asian languages.
12.Horizontal Type Mask is similar to the Horizontal Type tool, but a selection area is created rather than actual type.
13.Custom Shapes Use predefined shapes (or user created ones) in your graphic.
More Study Material
CBSE Class 8 Computer Science Photoshop Review Notes
We hope you liked the above notes for topic Photoshop Review which has been designed as per the latest syllabus for Class 8 Computer Science released by CBSE. Students of Class 8 should download and practice the above notes for Class 8 Computer Science regularly. All revision notes have been designed for Computer Science by referring to the most important topics which the students should learn to get better marks in examinations. Studiestoday is the best website for Class 8 students to download all latest study material.
Notes for Computer Science CBSE Class 8 Photoshop Review
Our team of expert teachers have referred to the NCERT book for Class 8 Computer Science to design the Computer Science Class 8 notes. If you read the concepts and revision notes for one chapter daily, students will get higher marks in Class 8 exams this year. Daily revision of Computer Science course notes and related study material will help you to have a better understanding of all concepts and also clear all your doubts. You can download all Revision notes for Class 8 Computer Science also from www.studiestoday.com absolutely free of cost in Pdf format. After reading the notes which have been developed as per the latest books also refer to the NCERT solutions for Class 8 Computer Science provided by our teachers
Photoshop Review Notes for Computer Science CBSE Class 8
All revision class notes given above for Class 8 Computer Science have been developed as per the latest curriculum and books issued for the current academic year. The students of Class 8 can rest assured that the best teachers have designed the notes of Computer Science so that you are able to revise the entire syllabus if you download and read them carefully. We have also provided a lot of MCQ questions for Class 8 Computer Science in the notes so that you can learn the concepts and also solve questions relating to the topics. All study material for Class 8 Computer Science students have been given on studiestoday.
Photoshop Review CBSE Class 8 Computer Science Notes
Regular notes reading helps to build a more comprehensive understanding of Photoshop Review concepts. notes play a crucial role in understanding Photoshop Review in CBSE Class 8. Students can download all the notes, worksheets, assignments, and practice papers of the same chapter in Class 8 Computer Science in Pdf format. You can print them or read them online on your computer or mobile.
Notes for CBSE Computer Science Class 8 Photoshop Review
CBSE Class 8 Computer Science latest books have been used for writing the above notes. If you have exams then you should revise all concepts relating to Photoshop Review by taking out a print and keeping them with you. We have also provided a lot of Worksheets for Class 8 Computer Science which you can use to further make yourself stronger in Computer Science
You can download notes for Class 8 Computer Science Photoshop Review for latest academic session from StudiesToday.com
Yes, you can click on the link above and download notes PDFs for Class 8 Computer Science Photoshop Review which you can use for daily revision
Yes, the notes issued for Class 8 Computer Science Photoshop Review have been made available here for latest CBSE session
You can easily access the link above and download the Class 8 Notes for Computer Science Photoshop Review for each topic in Pdf
There is no charge for the notes for CBSE Class 8 Computer Science Photoshop Review, you can download everything free of charge
www.studiestoday.com is the best website from which you can download latest notes for Photoshop Review Computer Science Class 8
Come to StudiesToday.com to get best quality topic wise notes for Class 8 Computer Science Photoshop Review
We have provided all notes for each topic of Class 8 Computer Science Photoshop Review as per latest CBSE syllabus